 Honda Accord: Audio System Basic Operation

To use the audio system function, the ignition switch must be in ACCESSORY
 or
ON
or
ON 
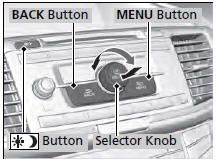
Use the selector knob or MENU button to access some audio functions.
Press  to switch between the
normal and
extended display for some functions.
to switch between the
normal and
extended display for some functions.
Selector knob: Rotate left or right to scroll through the available choices. Press to set your selection.
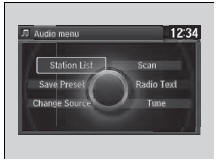
MENU button: Press to select any mode.
The available mode includes Change Source, Station List, Save Preset, Radio Text, Music Search, and play modes. Play modes can be also selected from Scan, Random/ Repeat, and so on.
BACK button: Press to go back to the previous display.
 button: Press to change the
audio/
information screen brightness.
button: Press to change the
audio/
information screen brightness.
Press  once and make an adjustment.
uEach time you press  , the mode
switches between the daytime mode,
nighttime mode and OFF mode.
, the mode
switches between the daytime mode,
nighttime mode and OFF mode.
These indications are used to show how to operate the selector knob.
Rotate  to select.
Press  to enter.
- Audio/Information Screen
- Adjusting the Sound
- Display Setup
- Playing AM/FM Radio
- Playing a CD
- Playing an iPod®
- Playing Internet Radio
- Playing a USB Flash Drive
- Playing Bluetooth® Audio
 Audio Remote Controls
Allows you to operate the audio system while driving.
The CD mode appears only when a CD is loaded.
...
 Audio/Information Screen
Displays the audio status and wallpaper. From this screen, you can go to
various
setup options.
• Switching the Display
Press the (display) button to
change the display.
• Audio
Shows ...
See also:
Tire Inspection
Every time you check inflation, you
should also examine the tires for
damage, foreign objects, and wear.
You should look for:
Bumps or bulges in the tread or
side of the tire. Replace the tire ...
Front Door Sash Inner Trim
Replacement
2-door
NOTE: Take care not to scratch the door.
1. Remove the door panel (see page 20-12).
2. Lower the glass fully.
3. Remove the door sash inner trim (A).
-1. Detach the clip fastening ...
DOT Tire Quality Grading (U.S. Vehicles)
The tires on your vehicle meet all U.S. Federal Safety Requirements. All
tires are
also graded for treadwear, traction, and temperature performance according to
Department of Transportation (DOT ...