 Honda Accord: Output Shaft (Countershaft) Speed
Sensor Replacement
Honda Accord: Output Shaft (Countershaft) Speed
Sensor Replacement
1. Remove the nut securing the under-hood fuse/relay box, and swing it out of the way.
2. Remove the intake air duct and the air cleaner housing.
3. Disconnect the output shaft (countershaft) speed sensor connector, and remove the output shaft (countershaft) speed sensor (A).
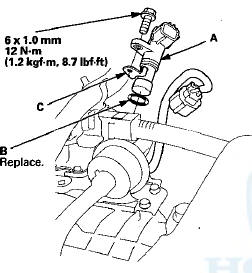
4. Install a new O-ring (B) on a new output shaft (countershaft) speed sensor with the speed sensor washer (C), then install the output shaft (countershaft) speed sensor in the transmission housing.
5. Check the connector for rust, dirt, or oil, and clean or repair if necessary, then connect the connector securely.
6. Install the intake air duct and the air cleaner housing.
7. Install the under-hood fuse/relay box.
 Input Shaft (Mainshaft) Speed Sensor
Replacement
Input Shaft (Mainshaft) Speed Sensor
Replacement
1. Remove the nut securing the under-hood fuse/relay
box, and swing it out of the way.
2. Remove the intake air duct and the air cleaner
housing.
3. Disconnect the input shaft (mainshaft) spee ...
 Transmission Fluid Pressure Switch A
(2nd Clutch) Replacement
Transmission Fluid Pressure Switch A
(2nd Clutch) Replacement
1. Remove the intake air duct.
2. Disconnect the connector (A) from the transmission
fluid pressure switch A (2nd clutch) (B), and remove
the transmission fluid pressure switch A (2nd clutch).
...
See also:
Vehicle Identification Number
Manufacturer, Make, and Type of Vehicle
1HG: Honda of America Mfg., inc.
Honda passenger vehicle .
JHM: Honda Motor Co., Ltd.
Honda passenger vehicle
Line, Body, and Engine Type
CP2: Accor ...
Hood Adjustment
1. Remove these Items:
- Front grille cover:
- 2-door (see page 20-274)
- 4-door (see page 20-274)
- Cowl covers (see page 20-278)
- Hood latch cover, 4-door (see step 2 on page 20-302)
2. Sligh ...
Compass Calibration
The compass may need to be
manually calibrated after exposure to
a strong magnetic field. If the
compass seems to be continually
showing the wrong direction and is
not self-calibrating, or ...