 Honda Accord: Hood Adjustment
1. Remove these Items: - Front grille cover: - 2-door (see page 20-274) - 4-door (see page 20-274) - Cowl covers (see page 20-278) - Hood latch cover, 4-door (see step 2 on page 20-302) 2. Slightly loosen the hood hinge mounting bolts (A) and the hood latch mounting bolts (B).
6x 1.0
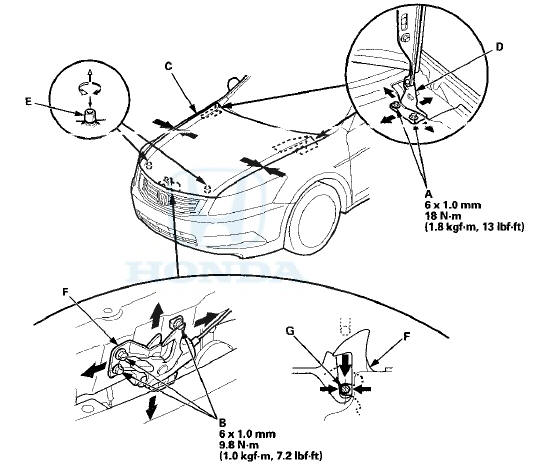
3. Adjust the hood (C) alignment in the following sequence: - Adjust the hood right and left, as well as forward and rearward, by using the elongated holes in the hood hinges (D).
- Turn the hood edge cushions (E), in or out as necessary, to make the hood fit flush with the body at the front and side edges.
4. Adjust the hood latch (F) to obtain the proper height at the forward edge, and move the latch right or left until the striker (G) is centered in the latch.
5. Tighten each bolt to the specified torque.
6. Check that the hood opens properly and closes securely.
7. Apply touch-up paint to the hinge mounting bolts and around the hinges, and let the paint dry.
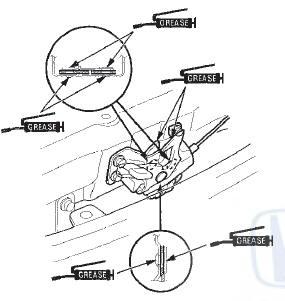
8. Apply multipurpose grease to the hood latch and the hood hinges as indicated by the arrows.

9. Reinstall all of the removed parts.
 Hood
Hood
...
 Hood Seal and Hood Molding
Replacement
Hood Seal and Hood Molding
Replacement
NOTE: Take care not to scratch the hood.
1. Detach the clips (A) with a clip remover, then remove
the hood seal (B). On Canada models: Detach the clips
(C), then remove the hood molding (D).
2-d ...
See also:
Audio Switch Panel
Removal/Installation
With Navigation
NOTE:
• Put on gloves to protect your hands.
• Take care not to scratch the dashboard and related
parts.
• Lay a workshop towel under the parts when working
on ...
Front Seat Removal/Installation
Special Tools Required
KTC Trim Tool Set SOJATP2014*
*Available through the Honda Tool and
Equipment
Program; call 888-424-6857
SRS components are located in this area. Review the
SRS component ...
Horn Switch Test
NOTE: Check for a blown No. 10 (20 A) fuse in the
under-hood fuse/relay box. If it is blown, check for a
faulty horn relay.
1. Turn the steering wheel 180 degrees from the center
position and re ...