
 Honda Accord: Hood Seal and Hood Molding
Replacement
Honda Accord: Hood Seal and Hood Molding
Replacement
NOTE: Take care not to scratch the hood.
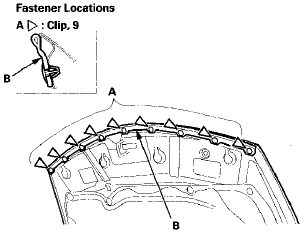
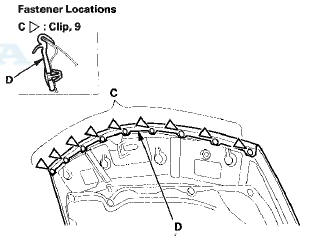
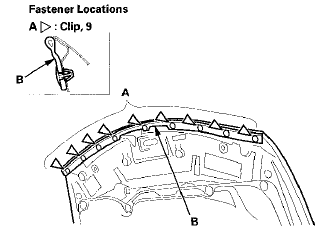
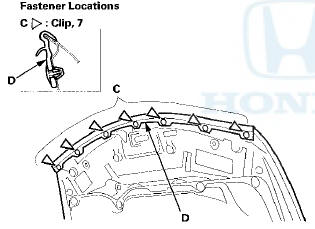
1. Detach the clips (A) with a clip remover, then remove the hood seal (B). On Canada models: Detach the clips (C), then remove the hood molding (D).
2-door - Except Canada models
2-door - Canada models
4-door - Except Canada models
4-door - Canada models
2. Install the seal or the molding in the reverse order of removal, and note these items: - If the clips are damaged or stress-whitened, replace them with new ones.
- Push the clips into place securely.
 Hood Adjustment
1. Remove these Items:
- Front grille cover:
- 2-door (see page 20-274)
- 4-door (see page 20-274)
- Cowl covers (see page 20-278)
- Hood latch cover, 4-door (see step 2 on page 20-302)
2. Sligh ...
 Hood insulator Replacement
For Some Models
NOTE; Take care not to scratch the hood.
1. Detach the clips with a clip remover. Remove the
hood insulator (A) by pulling it away from the hooks
(B).
2. Install the ins ...
See also:
HomeLink® Universal Transceiver*
The HomeLink® Universal Transceiver can be programmed to operate up to three
remote controlled devices around your home, such as garage doors, lighting, or
home security systems.
• Important S ...
Head Restraints
Your vehicle is equipped with head
restraints in all seating positions to
help protect you and your
passengers from the likelihood of
whiplash and other injuries.
They are most effective wh ...
Brake Pedal Position Switch Test
1. Disconnect the 4P connector (A) from the brake pedal
position switch (B).
2. Check for continuity between terminals No. 1 and No.
2.
• There should be continuity when the brake pedal ...