 Honda Accord: Piston Ring Replacement
1. Remove the piston from the engine block (see page 7-14).
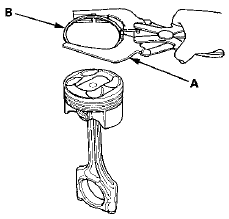
2. Using a ring expander (A), remove the old piston rings (B).
3. Clean all ring grooves thoroughly with a squared-off broken ring or ring groove cleaner with a blade to fit the piston grooves.
The top and 2nd ring grooves are 1.2 mm (0.05 in) wide. The oil ring groove is 2.0 mm (0.08 in) wide.
File down a blade if necessary.
Do not use a wire brush to clean the ring grooves, or cut the ring grooves deeper with the cleaning tools.
NOTE: If the piston is to be separated from the connecting rod, do not install the new rings yet.
4. Using a piston that has its rings removed, push a new ring (A) into the cylinder bore 15-”20 mm (0.6-”0.8 in) from the bottom.
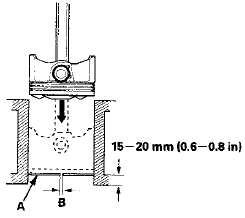
5. Measure the piston ring end-gap (B) with a feeler gauge: - If the gap is too small, check to see if you have the proper rings for your engine.
- If the gap is too large, recheck the cylinder bore diameter against the wear limits (see page 7-17).
If the bore is beyond the service limit, the engine block must be re bo red.
Piston Ring End-Gap
Top Ring: Standard (New): 0.20-0.35 mm (0.008- 0.014 in)
Service Limit: 0.60 mm (0.024 in)
Second Ring:
Standard (New): 0.50-0.65 mm (0.020-0.026 in)
Service Limit: 0.70 mm (0.028 in)
Oil Ring:
Standard (New): 0.20-0.70 mm (0.008-0.028 in)
Service Limit: 0.75 mm (0.030 in)
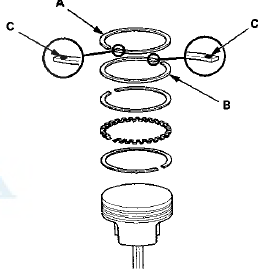
6. Install the top ring and the second ring as shown. The top ring (A) has a 1R mark, and the second ring (B) has a 2RN mark. The manufacturing marks (C) must face upward.
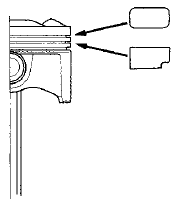
Piston Ring Dimensions

Top Ring (Standard):
A: 2.7 mm (0.11 in)
B: 1.2 mm (0.05 in)
Second Ring (Standard):
A: 3.4 mm (0.13 in
B: 1.2 mm (0.05 in)
7. After installing a new set of rings, measure the ring-to-groove clearances:
Top l i ng Clearance
Standard (New): 0.060-”0.085 mm
(0.0024-0.0033 in)
Service Limit: Р’В§.13 mm (0.005 In)
Second Ring Clearance
Standard (New): 0.040-”0.065 mm
(0.0016-0.0026 in)
Service Limit: 0.13 mm (0.005 in)
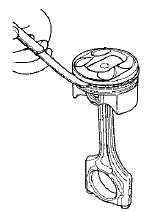
8. Rotate the rings in their grooves to make sure they do not bind.
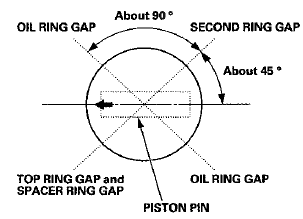
9. Position the ring end gaps as shown.
 Piston, Pin, and Confyssfeg EQC
Replacement
Disassembly
1. Remove the piston from the engine block (see page
7-14).
2. Apply new engine oil to the piston pin snap rings (A),
and turn them in the ring grooves until the end gaps
are lined ...
 Piston Installation
If the Crankshaft is Already Installed
1. Set the crankshaft to bottom dead center (BDC) for
each cylinder as its piston is installed.
2. Remove the connecting rod caps, then install the ring
co ...
See also:
Glass Position Adjustment
The roof panel (A) should be even with the glass
weatherstrip (B), to within 0+1/— 1 mm
(0+0.04/—0.04 in) all the way around. If not make the
following adjustment:
1. Remove the brac ...
Switch Test/Replacement
1. Separate the lumbar support switch cover (A) from
the switch (B).
2. Disconnect the 5P connector (C) from the switch.
3. Check for continuity between the terminals in each
switch position a ...
Parts Marking
To deter vehicle theft, certain major components are marked with the vehicle
identification number (VIN). Original parts
have self-adhesive labels. Replacement body parts have generic self-adhesive ...
