 Honda Accord: Intermediate Shaft Reassembly
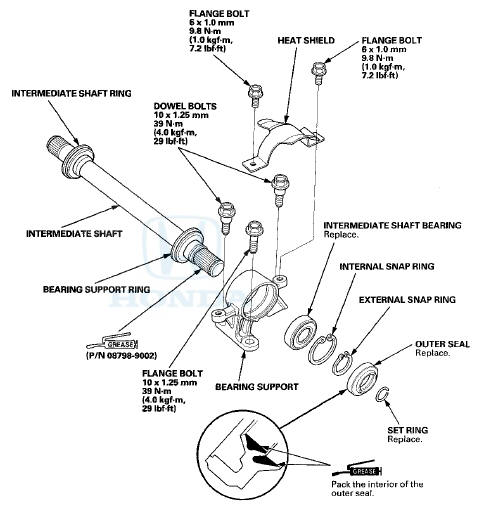
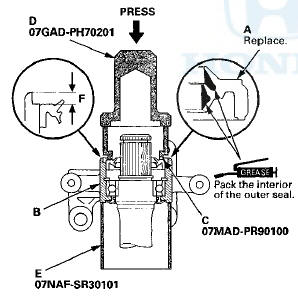
Exploded View
Special Tools Required
-Oil Seal Driver 07GAD-PH70201
-Half Shaft Base 07NAF-SR30101
-Attachment 52 x 55 mm 07746-0010400
-Attachment 35 mm I.D. 07746-0030400
-Driver Handle, 15 x 135L 07749-0010000
-Attachment 45 x 55 mm 07MAD-PR90100
NOTE; Refer to the Exploded View, as needed, during this procedure.
1. Clean the disassembled parts with solvent, and dry them with compressed air.
NOTE: Do not wash the rubber parts with solvent.
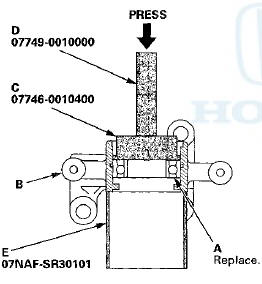
2. Press a new intermediate shaft bearing (A) into the bearing support (B) using the 52 x 55 mm attachment and a press.
3. Install the internal snap ring (A) into the groove (B) of the bearing support.
4. Press the intermediate snatt |A) into the shaft bearing (B) using the 35 mm attachment (C) and the press.
5. Install the external snap ring (A) into the groove of the intermediate shaft (B).
. Install a new outer seal (A) into the bearing support (B) using the 45X55 mm attachment (C), the oil seal driver (D), the half shaft base (E), and the press. Press in the seal until it is 4 В± 0.2 mm (0.16 В± 0.008 in) (F) below the surface of the bearing support end.
7. Install the heat shield (A).
 Intermediate Shaft Disassembly
Special Tools Required
•Half Shaft Base 07NAF-SR30101
-Oil Seal Driver, 44.5 mm 07947-SB00100
1. Remove the heat shield (A).
3. Press the intermediate shaft (A) out of the
intermediate s ...
 Intermediate Shaft Installation
1. Clean the areas where the Intermediate shaft contacts
the differential thoroughly with solvent, and dry then
with compressed air.
NOTE: Do not wash the rubber parts with solvent.
2. Install ...
See also:
F-CAN Circuit Troubleshooting
1. Turn the ignition switch to LOCK (0).
2. Jump the SCS line with the HDS.
3. Disconnect ECM/PCM connector A (49P).
4. Measure the resistance between ECM/PCM connector
terminals A3 and A4.
...
Seat
Driver's seat
- 4-door
2-door
Front passenger's seat
4-cfoor
2-door
...
A/C Compressor Clutch Circuit
Troubleshooting
NOTE:
• It is normal for the A/C compressor to turn off under
certain conditions, such as low idle, high engine
coolant temperature, hard acceleration, or high/low
refrigerant pressure.
в ...