 Honda Accord: Side Airbag Replacement
NOTE: If replacing the side airbag after deployment, refer to Component Replacement/Inspection After Deployment (see page 24-208) for a complete list of other parts that must also be replaced.
Removal
1. Do the battery terminal disconnection procedure (see page 22-91), then wait at least 3 minutes before starting work.
2. Remove the front seat (see page 20-194).
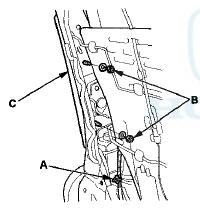
3. Remove the seat-back cover/pad: • 4-door (see page 20-221) • 2-door (see page 20-213) 4. Detach the harness clip (A) from the seat-back frame.
Remove the two mounting nuts (B) and the side airbag (C).
Installation
NOTE: • Ifthe side airbag l id is secured with tape, remove the tape, • Do not open the lid on the side airbag cover.
• Use n e w m o u n t i n g nuts t i g h t e n e d t o t h e s p e c i f i ed t o r q u e .
• Make s u r e t h a t t h e seat-back cover is i n s t a l l ed p r o p e r l y . I m p r o p e r i n s t a l l a t i on m a y prevent proper deployment.
• Be s u r e t o i n s t a l l t h e harness w i r e s so t h a t i t is n o t pinched o r i n t e r f e r i n g w i t h other parts.
1. T o r q u e t h e s i d e airbag (A) o n t h e seat-back f r a m e.
Install t h e t w o s i d e a i r b a g n e w m o u n t i n g nuts (B), t h e n install t h e harness c l ip (C).
2. Install t h e seat-back cover/pad in t h e reverse order of removal: • 4-door (see page 20-221) • 2-door (see p a g e 20-213) 3. Install t h e f r o n t seat (see page 20-194).
4. Do t h e b a t t e r y t e r m i n a l reconnection procedure (see page 22-91).
5. M o v e t h e f r o n t seat and t h e seat-back t h r o u g h their f u l l ranges o f m o v e m e n t , m a k i n g sure t h e harness w i r e s are n o t p i n c h e d or i n t e r f e r i n g w i t h other parts.
6. Clear a n y DTCs w i t h t h e HDS (see p a g e 24-38).
7. A f t e r i n s t a l l i ng t h e s i de a i r b a g , c o n f i rm proper s y s t em o p e r a t i o n : T u r n t h e i g n i t i o n s w i t c h t o O N (II); t h e SRS indicator should come on for about 6 seconds a nd t h e n g o off.
 Front Passenger's Airbag Replacement
NOTE: If r e p l a c i n g t h e f r o n t passenger's airbag after
d e p l o y m e n t , refer t o Component Replacement/
Inspection A f t e r Deployment (see page 24-208) f o r a
c o m p l e t e ...
 Side Curtain Airbag Replacement
Removal
NOTE:
• If replacing the side curtain airbag after deployment, refer to Component
Replacement/Inspection After Deployment
(see page 24-208) for a complete list of other parts that mu ...
See also:
Audio System Basic Operation
To use the audio system function, the ignition switch must be in ACCESSORY
or
ON
Use the selector knob or MENU button to
access some audio functions.
Press to switch between the
normal ...
Seat Belt Inspection
Regularly check the condition of your seat belts as follows:
• Pull each belt out fully, and look for frays, cuts, burns, and wear.
• Check that the latches work smoothly and the belts retract ...