 Honda Accord: Side Curtain Airbag Replacement
Removal
NOTE: • If replacing the side curtain airbag after deployment, refer to Component Replacement/Inspection After Deployment (see page 24-208) for a complete list of other parts that must also be replaced.
• Review t h e i n t e r i o r t r im replacement procedure before d o i n g repair o r service, 4-door (see page 20-104), 2-door (see page 20-103).
• Removal of t h e s i de c u r t a i n a i r b a g must be d o n e a c c o r d i n g t o Precaution a n d Procedures (see page 24-25).
1. Do t h e b a t t e r y t e r m i n a l d i s c o n n e c t i o n procedure (see page 22-91), t h e n w a i t at least 3 m i n u t e s before s t a r t i n g work.
2. Remove t h e headliner (see page 20-140).
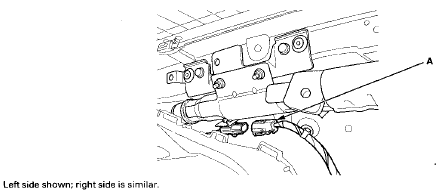
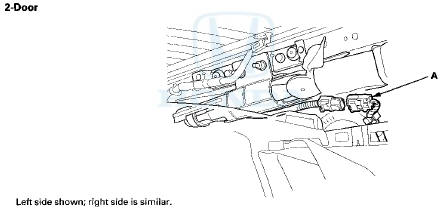
3. Disconnect t h e SRS f l o o r w i r e harness 2P c o n n e c t o r (A) f r om t h e s i d e c u r t a i n a i r b a g 2P connector.
4-Door
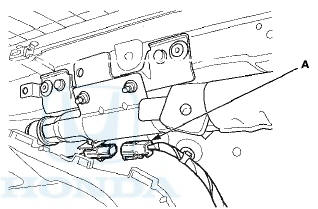
Left side shown; right side is similar.
2-Door
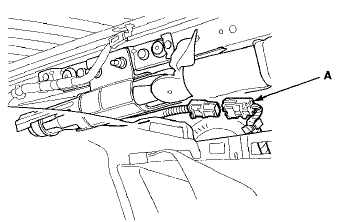
Left side shown; right side is similar.
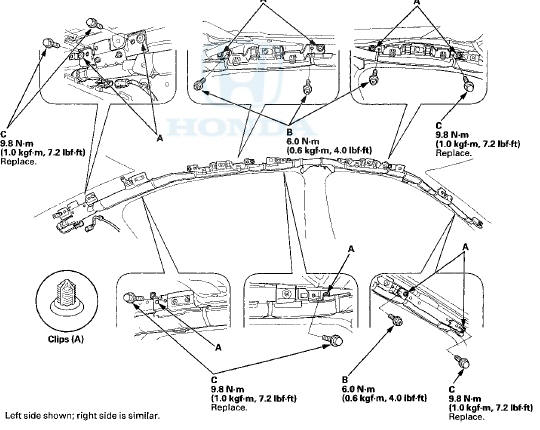
4. Remove t h e m o u n t i n g bolts (A) a n d m o u n t i n g bolts (B) f r om t h e bracket. Detach t h e c l i p s (C), t h e n r e m o v e t h e side c u r t a i n a i r b a g (D).
4-Door
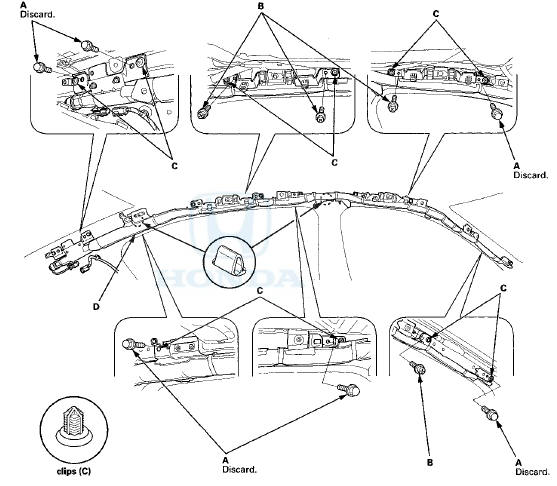
Left side shown; right side is similar.
2-Door
Left side shown; right side is similar.
Installation
NOTE: • If replacing the side curtain airbag after deployment refer to Component Replacement/Inspection After Deployment (see page 24-208) f o r a c o m p l e t e list o f other parts t h a t must also be replaced.
• Installation of t h e side c u r t a in airbag must be d o n e according t o precautions and procedures (see page 24-25).
• If t h e a i r b a g is f r a y e d , o r has a n y o t h e r v i s i b l e damage, replace it. Do not a t t e m p t t o repair a n airbag.
• When y o u install t h e airbag, make sure it is not t w i s t e d , a n d t h a t it is n o t caught between t h e i n f l a t o r bracket by t he bracket bolts.
• Make sure that t h e side curtain a i r b a g i n f l a t o r retainer is i n s t a l l ed p r o p e r l y . Otherwise t h e a i r b a g c o u l d incorrectly deploy and cause damage or injuries.
• If t h e r e is a n y damage t o t h e side c u r t a i n a i r b a g , d o not t r y t o repair it. Replace a n y d a m a g e d side c u r t a in airbag.
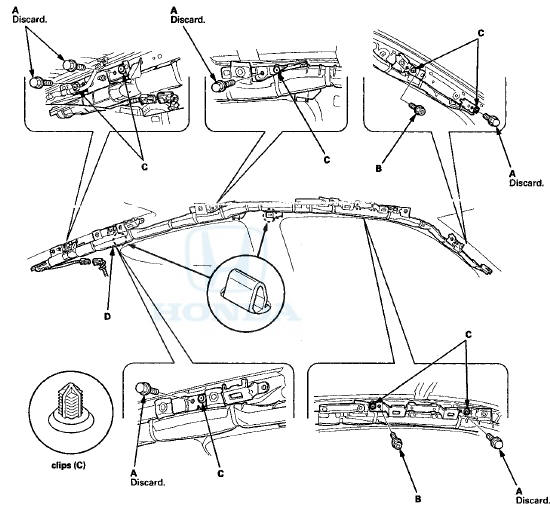
1. Place t h e side c u r t a in airbag assembly o n t h e side o f t h e roof, a n d fit its c l i p s (A) i n to t h e holes in t h e body. Tighten t he side c u r t a in airbag m o u n t i n g b o l ts (B) a n d n e w m o u n t i n g bolts (C) t o t h e specified t o r q u e , a n d t h e c l ip is pushed until s t o p p i n g .
4-Door
2-Door

2. Connect t h e SRS f l o o r w i r e harness 2P connector (A) t o t h e side c u r t a i n airbag 2P connector.
4-Door
3. Do t h e b a t t e r y t e r m i n a l reconnection procedure (see page 22-91).
4. Clear any DTCs w i t h t h e HDS (see page 24-38).
5. A f t e r i n s t a l l i ng t h e side c u r t a i n a i r b a g , c o n f i rm proper s y s t em o p e r a t i o n : T u r n t h e i g n i t i o n s w i t c h t o ON (II); t h e SRS indicator s h o u l d c o m e o n f o r about 6 seconds and t h e n go off.
6. Install all r e m o v e d parts in reverse order of r e m o v a l , If any c l i p s are stress-whitened, replace t h e m w i t h n ew ones.
7. C o n f i rm proper headliner/pillar t r im overlap (see page 24-210).
 Side Airbag Replacement
NOTE: If replacing the side airbag after deployment,
refer to Component Replacement/Inspection After
Deployment (see page 24-208) for a complete list of
other parts that must also be replaced.
Rem ...
 Airbag and Tensioner Disposal
Special Tools Required
Deployment Tool 07HAZ-SG00500
Before scrapping any airbags, side airbags, side curtain
airbags, seat belt tensioners, (including those in a whole
vehicle to be scrapped), th ...
See also:
Vanity Mirror
To use the vanity mirror on the back
of the sun visor, pull up the cover.
The vanity mirror lights come on
when you pull up the cover. ...
Special Tools
...