 Honda Accord: Front Passenger's Airbag Replacement
NOTE: If r e p l a c i n g t h e f r o n t passenger's airbag after d e p l o y m e n t , refer t o Component Replacement/ Inspection A f t e r Deployment (see page 24-208) f o r a c o m p l e t e list of other parts t h a t must also be replaced.
Removal
1. Do t h e battery t e r m i n a l disconnection procedure (see page 22-91), t h e n w a i t at least 3 m i n u t e s before s t a r t i ng work.
2. Open t h e g l o v e box. Remove t h e g l o v e box s t o p on t h e r i g h t side, then let the glove box hang down (see page 20-174).
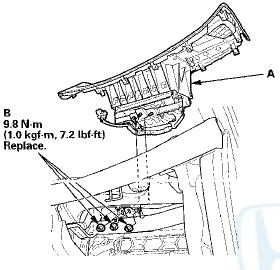
3. Detach t h e connector c l i p , t h e n disconnect the dashboard w i r e harness 4P connector (A) f r om f r o nt passenger's airbag 4P connector. Remove t h e nuts (B).
4. Remove t h e dashboard side l id (see step 6 o n page 20-175).
5. Place the cardboard (A) between the center display v i s o r a n d t h e passenger's airbag. U s i n g o n l y your hands, f i r s t lift t h e right side, t h e n lift t h e left side, and remove t h e f r o n t passenger's a i r b a g a n d l id assembly (B) f r om t h e dashboard.
NOTE: The airbag l id has p a w l s (C) o n each side w h e r e it attaches t o t h e dashboard.
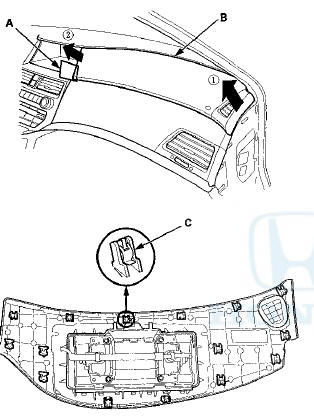
6. Cut t h e f o u r parts o f t h e l id as s h o w n (A), a n d detach V t h e f r o n t passenger's airbag.
NOTE: • Always replace t h e uppec d a s h b o a r d panel whenever y o u r e m o v e t h e a i r b a g f r om t h e panel.
• Replace t h e a i r b a g if t h e a i r b a g m o u n t i n g hooks or its h o u s i n g is damaged.
7. Insert t h e hooks (A) of t h e f r o n t passenger's airbag h o u s i n g i n to t h e n e w upper dashboard panel, t h en insert t h e other hooks (B) i n to t h e panel.
NOTE: • Make sure t h e r e are no objects between t h e airbag and t h e upper panel.
• Make sure t h e a i r b a g is f u l l y seated, a n d make sure t h e upper panel is not d e f o r m e d or damaged after t h e airbag is in place.
• Do not use tools when detaching the front passenger's airbag in order t o protect it.
• Make sure t h e hooks are set properly.
Installation
1. Place the front passenger's airbag and lid assembly (A) into the dashboard. Torque the front passenger's airbag new mounting nyts (B).
2. Connect the dashboard wire harness 4P connector (A) to the front passenger's airbag 4P connector, then install the connector clip. Reinstall the glove box (see page 20-174).
3. Reinstall the dashboard side lid (see step 6 on page 20-175).
4. Do the battery terminal reconnection procedure (see page 22-91).
5. Clear any DTCs with the HDS (see page 24-38).
6. After installing the airbag, confirm proper system operation: Turn the ignition switch to ON (ll); the SRS indicator should come on for about 6 seconds and then go off.
 Driver's Airbag Replacement
NOTE: If replacing the driver's airbag after deployment,
refer to Component Replacement/Inspection After
Deployment (see page 24-208) for a complete list of.
other parts that must also be replace ...
 Side Airbag Replacement
NOTE: If replacing the side airbag after deployment,
refer to Component Replacement/Inspection After
Deployment (see page 24-208) for a complete list of
other parts that must also be replaced.
Rem ...
See also:
Emissions Controls
The burning of gasoline in your
vehicle’s engine produces several byproducts.
Some of these are carbon
monoxide (CO), oxides of nitrogen
(NOx), and hydrocarbons (HC).
Gasoline evaporating fr ...
Checking Seat Belt Fit
To determine if a lap/shoulder belt
properly fits a child, have the child
put on the seat belt, then ask
yourself:
1. Does the child sit all the way back
against the seat?
2. Do the childâ ...
Front Inner Fender Replacement
NOTE:
- Put on gloves to protect your hands.
- Take care not to scratch the body.
- When prying with a flat-tip screwdriver, wrap it with protective tape to
prevent damage.
1. Remove the f ...