 Honda Accord: Connecting Rod Bearing Replacement
Connecting Rod Bearing Clearance Inspection
1. Remove the oil pump (see page 8-17).
2. Remove the baffle plate (see step 8 on page 7-14).
3. Remove the connecting rod cap and the bearing half.
4. Clean the crankshaft rod journal and the bearing half with a clean shop towel.
5. Place plastigage across the rod journal.
6. Reinstall the bearing half and the cap, and torque the bolts to 41 Nm (4.2 kgf-m, 30 ibfft) +120 Р’В°.
NOTE: - Apply new engine oil to the bolt threads and flanges.
- Do not rotate the crankshaft during inspection.
7. Remove the rod cap and the bearing half, and measure the widest part of the plastigage.
Connecting Rod Bearing-to-Journafi Oil
Clearance
Standard (Mew): 0.032-0.066 mm
(0.0013 -0.0026 in)
Service Limit: 0.077 mm (0.0030 in)

8. If the plastigage measures too wide or too narrow, remove the cap, and the upper half of the bearing, install a new, complete bearing with the appropriate color code(s), and recheck the clearance. Do not file, shim, or scrape the bearings or the caps to adjust clearance.
9. If the plastigage shows the clearance is still incorrect, try the next larger or smaller bearing (the color listed above or below the current one), and check clearance again. If the proper clearance cannot be obtained by using the appropriate larger or smaller bearing, replace the crankshaft and start over.
Connecting Rod Bearing Selection
1. Inspect each connecting rod for cracks and heat damage.
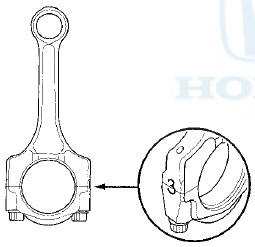
Connecting Rod Big End Bore Code Locations
2. Each connecting rod has a tolerance range from 0 to 0.024 mm (0.0009 in), in 0.006 mm (0.0002 in) increments, depending on the size of its big end bore.
It is then stamped with a number or bar (1,2,3, or 4/I, ll, 111, or llll) indicating the range. You may find any combination of numbers and bars in any engine. (Half the number or bar is stamped on the bearing cap, the other half is on the rod.) If you cannot read the code because of an accumulation of oil and varnish, do not scrub it with a wire brush or scraper. Clean it only with solvent or detergent.
Large-end Bore Size: 51.0 mm (2.01 in)
Connecting Rod Journal Code Location
3. The connecting rod journal codes are stamped on the crankshaft in either location.
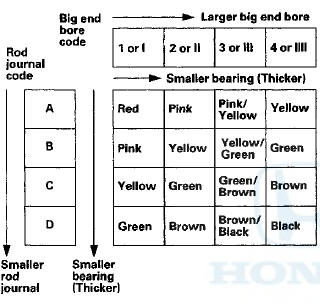
4. Use the big end bore codes and the rod journal codes to select appropriate replacement bearings from the following table.
NOTE: - The color code is on the edge of the bearing.
- When using bearing halves of different colors, it does not matter which color is used in the top or bottom.
 Crankshaft Main Bearing Replacement
Main Bearing Clearance Inspection
1. To check the main bearing-to-journal oil clearance,
remove the lower block and the bearing halves (see
page 7-14).
2. Clean each main journal and the bearing ...
 Oil Pan Remowal
1. If the engine is already out of the vehicle, go to step
19.
2. Remove the strut brace (if equipped) (see page
20-306).
3. Do the battery removal procedure (see page 22-92).
4. Remove the ...
See also:
Subframe Replacement
Special Tools Required
Subframe Alignment Pin 070AG-SJAA10S
Front Subframe Torque
After removing the subframe mounting bolts, the front subframe middle rubber
mount mounting bolts, the front
sub ...
Protecting Child Passengers
Each year, many children are injured or killed in vehicle crashes because
they are
either unrestrained or not properly restrained. In fact, vehicle accidents are
the
number one cause of death ...
CD Player
If a disc error occurs, you may see the following error messages.
...