 Honda Accord: Cf Hinder Bore Honing
Only a scored or scratched cylinder bore must be honed.
1. Measure the cylinder bores (see page 7-17).
If the engine block is to be reused, hone the cylinders, and remeasure the bores.
2. Remove the oil jets (see page 8-14).
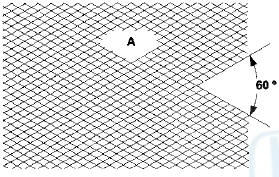
3. Hone the cylinder bores with honing oil and a fine (400 grit) stone in a 60 degree cross-hatch pattern (A).
Use only a rigid hone with 400 grit or finer stone such as Sunnen, Ammco, or equivalent. Do not use stones that are worn or broken.
4. When honing is complete, thoroughly clean the engine block of all metal particles. Wash the cylinder bores with hot soapy water, then dry and oil them immediately to prevent rusting. Never use solvent, it will only redistribute the grit on the cylinder walls.
5. If scoring or scratches are still present in the cylinder bores after honing the engine block to the service limit, rebore the engine block. Some light vertical scoring and scratching is acceptable if it is not deep enough to catch your fingernail, and does not run the full length of the bore.
6. Install the oil jets (see page 8-14).
 Block and Piston inspection
1. Remove the crankshaft and the pistons (see page
7-14).
2. Check the piston for distortion or cracks.
3. Measure the piston diameter at a point 13 mm (0.5 in)
from the bottom of the skirt. T ...
 Piston, Pin, and Confyssfeg EQC
Replacement
Piston, Pin, and Confyssfeg EQC
Replacement
Disassembly
1. Remove the piston from the engine block (see page
7-14).
2. Apply new engine oil to the piston pin snap rings (A),
and turn them in the ring grooves until the end gaps
are lined ...
See also:
Wheel Alignment
The suspension can be adjusted for front and rear toe.
Pre-Alignment Checks
For proper inspection and adjustment of the wheel ;
alignment, do these checks:
1. Release the parking brake-to avoid an ...
Track Repeat
To replay the current track
continuously, select TRACK
REPEAT, and press ENTER on the
interface selector. As a reminder,
you will see REPEAT next to
TRACK on the screen. To turn this
featu ...
Automatic Seat Belt Tensioners
For added protection, the front seat
belts are equipped with automatic
seat belt tensioners. When activated,
the tensioners immediately tighten
the belts to help hold the driver and
a fron ...