 Honda Accord: Audio System Basic Operation

To use the audio system function, the power mode must be in ACCESSORY or ON.
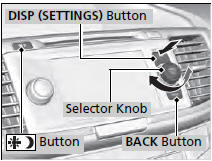
Use the selector knob, DISP and BACK buttons to access some audio functions.
Press  to switch between the
normal and
extended display for some functions.
to switch between the
normal and
extended display for some functions.
Selector knob: Rotate left or right to scroll through the available choices. Press to set your selection.
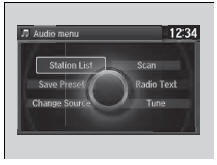
Also press to select any mode. The available mode includes Change Source, Station List, Save Preset, Radio Text, Music Search, and play modes. Play modes can be also selected from Scan, Random/Repeat, and so on.
BACK button: Press to go back to the previous display.
 button: Press to change the
audio/
information screen brightness.
button: Press to change the
audio/
information screen brightness.
Press  once and make an adjustment.
uEach time you press , the mode
switches between the daytime mode,
nighttime mode and OFF mode.
, the mode
switches between the daytime mode,
nighttime mode and OFF mode.
These indications are used to show how to operate the selector knob.
Rotate  to select.
Press  to enter.
- Audio with Touch Screen
- Audio/Information Screen
- Display Setup
- Playing AM/FM Radio
- Playing XM® Radio
- Playing a CD
- Playing an iPod®
- Playing Internet Radio
- Playing a USB Flash Drive
- Playing Bluetooth® Audio
 Playing Bluetooth® Audio
Your audio system allows you to listen to music from your
Bluetooth®-compatible
phone.
This function is available when the phone is paired and connected to the
vehicle's
Bluetooth® HandsFre ...
 Audio with Touch Screen
Use the touch screen to operate the audio system.
• Selecting an Audio Source
Select Source, then select an icon on the source list to switch the
audio source.
• Displaying the Menu Items
...
See also:
Front Seat Slide Motor Replacement
SRS components are located in this area. Review the
SRS component locations, 2-door (see page 24-23),
4-door (see page 24-21) and the precautions and
procedures (see page 24-25) before doing repair ...
Starting the Engine
1. Make sure the parking brake is applied.
2. Check that the shift lever is in
, then
depress the brake pedal.
- Although it is possible to start the vehicle
in , it is safer to st ...
Front Fender Trim Replacement
2-door
NOTE:
- Take care not to scratch the front grille cover or the
body.
- When prying with a flat-tip screwdriver, wrap it with
protective tape to prevent damage.
- The left side is show ...