 Honda Accord: Shift Cable Replacement
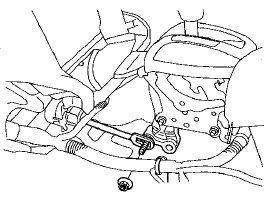
1. Remove the center console (see page 20-158).
2. Move the shift lever to R.
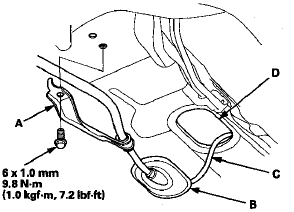
3. Remove the nut securing the shift cable end.
5. Rotate the socket holder retainer (A) counterclockwise (B) until it stops, and push the retainer lock (C) into the socket holder retainer to lock the retainer.
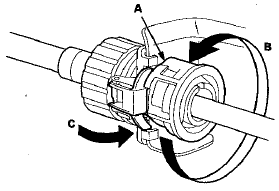
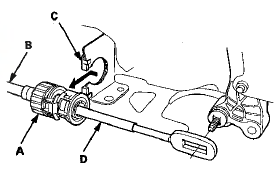
6. Slide the socket holder (A) away from the bracket as shown to remove the shift cable (B) from the shift cable bracket (C). Do not remove the shift cable by pulling the shift cable guide (D).
7. Raise the vehicle on a lift, or apply the parking brake, block both rear wheels, and raise the front of the vehicle. Make sure it is securely supported.
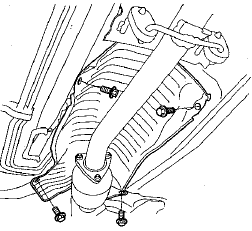
8. Vehicles with JHM VINs: Remove the shift cable cover (A).

9. Vehicles with JHM VINs: Remove the spring clip (B) and the control pin (C), and separate the shift cable end (D) from the selector control lever (E). Remove the two bolts securing the shift cable bracket (F).
10. Vehicles with 1HG VINs: Remove the shift cable cover (A), and remove the two bolts securing the shift cable bracket (B).
11. Vehicles with 1HG VINs: Pry up the lock tab of the lock washer (C), and remove the lock bolt (D) and the lock washer, then separate the shift cable (E) from the control shaft (F).
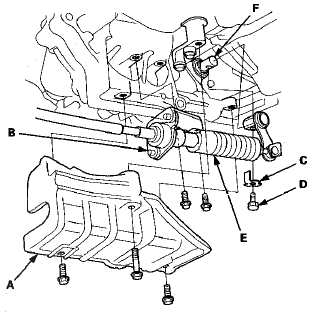
12. Remove the heat shield.
13. Remove the bolts securing the shift cable bracket (A).
14. Remove the shift cable grommet (B), and pull out the shift cable (C).
15. Insert a new shift cable through the grommet hole (D), and install the grommet in its hole. Do not bend the shift cable excessively.
16. Install the shift cable bracket.
17. Install the heat shield.
18. Vehicles with JHM VINs: Apply molybdenum grease to the hole in the bushing (A) in the shift cable end (B).
Attach the shift cable end to the selector control lever (C), then insert the control pin (D) into the control lever hole through the shift cable end, and secure the control pin with the spring clip (E). Do not bend the shift cable excessively.
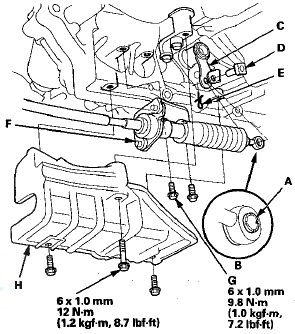
19. Vehicles with JHM VINs: Install the shift cable bracket (F) with the two bolts (G).
20. Vehicles with JHM VINs: Install the shift cable cover (H).
21. Vehicles with 1 HG VINs: Install the selector control lever (A) over the selector control shaft (B). Secure the control lever with a new lock washer (C) and the lock bolt (D), then bend the lock tab of the lock washer against the bolt head. Do not bend the shift cable excessively.

22. Vehicles with 1 HG VINs: Install the shift cable bracket (E) with the two bolts (F).
23. Vehicles with 1 HG VINs: Install the shift cable cover (G).
24. Install the shift cable on the shift lever, and adjust the shift cable (see page 14-232).
25. Install the center console (see page 20-158).
 Shift Lever Disassembly/Reassembly
Type A Shift Lever
NOTE: Make sure not to get any silicone grease on the terminal part of the
connectors and switches, especially if you
have silicone grease on your hands of gloves.
Type B Shi ...
 Shift Cable Adjustment
1. Remove the center console (see page 20-158).
2. Move the shift lever to R.
3. Remove the nut securing the shift cable end.
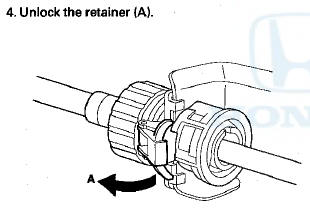
4. Unlock the retainer (A).
5. Rotate the socket holder retain ...
See also:
Tire Pressure Monitoring System (TPMS) -Required Federal Explanation
Each tire, including the spare (if provided), should be checked monthly when
cold and inflated to the inflation pressure recommended by the vehicle
manufacturer on the vehicle placard or tire infl ...
Fuse/Relay Boxes
Connector to Fuse/Relay Box Index
Under-hood Fuse/Relay Box
*: '08-09 models
Driver's Under-dash Fuse/Relay B O M
Passenger's Under-dash Fuse/Relay Box
*1: LX, LX PZEV, LX-P, LX-P PZE ...
Seat Belt System Components
Your seat belt system includes lap/
shoulder belts in all seating positions.
The front seat belts are also
equipped with automatic seat belt
tensioners.
The seat belt system
includes an in ...