 Honda Accord: TPMS Control Unit Replacement
NOTE: Make sure the TPMS control unit mounting bracket is not bent or twisted as this may affect its communication with the tire pressure sensors.
1. Turn the ignition switch to LOCK (0).
2. Remove the flange bolt (A), then remove the TPMS control unit (B) with the bracket (C).
NOTE: The TPMS control unit is located over the accelerator pedal module.
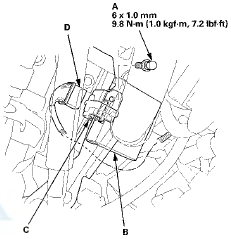
3. Disconnect the TPMS control unit connector (D).
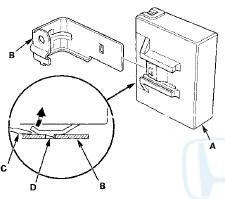
4. Remove the TPMS control unit (A) from the bracket (B).
NOTE: To disconnect the TPMS control unit from its bracket, insert a small flat-tipped screwdriver (C) between the TPMS control unit and the bracket to release the hook (D), then slide out the TPMS control unit.
5. Install the TPMS control unit in the reverse order of removal.
NOTE: Make sure the TPMS control unit is properly installed. You will hear a click when the TPMS control unit is securely mounted on the bracket.
6. Connect the HDS, and memorize the tire pressure sensor IDs using the TPMS tool (see page 18-60).
 Symptom Troubleshooting
Loiw tire pressure Indicator does not come on,
and no DTCs are stored
NOTE: Check for gauge DTCs with the HDS (see page
22-3). If gauge DTCs are stored, troubleshoot those DTCs
first.
1. Turn t ...
 Tire Pressure Sensor Replacement
Removal
Each tire pressure sensor contains a lithium anode
battery that is not removable. The complete tire pressure
sensor should be disposed of according to local battery
disposal guidelines o ...
See also:
Special Tools
...
Output Shaft (Countershaft) Speed
Sensor Replacement
NOTE: For A/T models (see page 14-188).
M/T
1. Disconnect the output shaft (countershaft) speed
sensor 3P connector (A).
2. Remove the output shaft (countershaft) speed sensor
(B).
3. Instal ...
Parking Brake Switch Test
NOTE: if both the ABS/VSA indicator and the brake
system indicator come on at the same time, check the
VSA system for DTCs first (see page 19-48).
1. Remove the center console (see page 20-158).
...