 Honda Accord: Idle Speed Inspection
NOTE: - Before checking the idle speed, check these items:
- The malfunction indicator lamp (MIL) has not been reported on, and there are no DTCs.
- Ignition timing
- Spark plugs
- Air cleaner
- PCV system
- Apply the parking brake, and make sure the headlights are off.
1. Disconnect the evaporative emission (EVAP) canister purge valve connector.
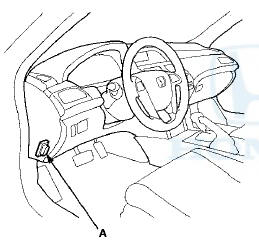
2. Connect the HDS to the data link connector (DLC) (A) located under the driver's side of the dashboard.
3. Make sure the HDS communicates with the ECM/PCM. If it doesn't, go to the DLC circuit troubleshooting (see page 11-181).
4. Start the engine. Hold the engine speed at 3,000 rpm without load (A/T in P or N, M/T in neutral) until the radiator fan comes on, then let it idle.
5. Check the idle speed without load conditions: headlights, blower fan, radiator fan, and air conditioner off.
Idle speed should be:

6. Let the engine idle for 1 minute with high electric load (A/C on, temperature set to max cool, blower fan on high, headlights on high beam).
Idle speed should be:

NOTE: If the idle speed is not within specification, do the ECM/PCM idle learn procedure (see page 11-293).
If the idle speed is still not within specification, go to the symptom troubleshooting.
7. Reconnect the EVAP canister purge valve connector.
 Brake Pedal Position Switch Signal
Circuit Troubleshooting
Brake Pedal Position Switch Signal
Circuit Troubleshooting
1. Turn the ignition switch to ON (II).
2. Check the BRAKE SWITCH in the DATA LIST with the
HDS.
Does it indicate OFF?
YES-Go to step 3.
NO-lnspect the brake pedal position switch (see page ...
 ECM/PCM Idle Learn Procedure
The idle learn procedure must be done so the ECM/PCM
can learn the engine idle characteristics.
Do the idle learn procedure whenever you do any of
these actions:
- Replace ECM/PCM.
...
See also:
Audio System Basic Operation
To use the audio system function, the power mode must be in ACCESSORY or ON.
Use the interface dial or MENU button to
access some audio functions.
Press to switch between the
normal and
ext ...
Vehicle Identification Number
Manufacturer, Make, and Type of Vehicle
1HG; Honda of America Mfg., Inc.
Honda passenger vehicle
Line, Body, and Engine Type
CS1: Accord Coupe/K24Z3
Body Type and Transmission Type
1: 2-door ...
Adjusting the Steering Wheel
The steering wheel height and distance from your body can be adjusted so that
you
can comfortably grip the steering wheel in an appropriate driving posture.
1. Pull the steering wheel adjustmen ...