 Honda Accord: System Evacuation
• Air conditioning refrigerant or lubricant v a p o r c an irritate your eyes, nose, or throat.
•Be careful when connecting service equipment.
• Do not breathe refrigerant or vapor.
NOTE; • If accidental system discharge occurs, ventilate the work area before resuming service.
• Additional health and safety information may be obtained from the refrigerant and lubricant manufacturers.
• Do not allow moisture to contaminate the A/C system oil. Moisture in the oil is difficult to remove, and it can damage the A/C compressor.
1.When an A/G system has been opened to the atmosphere, such as during installation or repair, it must be evacuated using an R-134a refrigerant recovery/recycling/charging station. If the system has been open for several days, the receiver/dryer should be replaced, refrigerant oil should be drained and replaced with new oil, and the system should be evacuated for several hours.
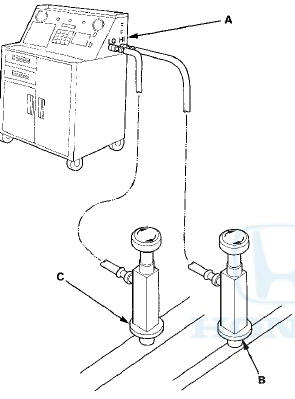
2. Connect a n R-134a refrigerant recovery/recycling/charging station (A) to the high-pressure service port (B) and the low-pressure service port (C), as shown, following the equipment manufacturer's instructions. Recover the refrigerant, if any, from the A/C system (see page 21-80).
3. Evacuate the system. The vacuum pump should run for a minimum of 45 minutes to eliminate all moisture from the system. When the suction gauge reads -93.3 kPa (-700 mmHg, -27.6 inHg) for at least 45 minutes, close all valves, and turn off the vacuum pump.
4. If the suction gauge does not reach approximately - 9 3 . 3 kPa (-700 mmHg, -27.6 inHg) in 15 minutes, there is probably a leak in the system. Partially charge the system, and check for leaks (see page 21-82).
 Refrigerant Recovery
• Air conditioning refrigerant or lubricant vapor can
irritate your eyes, nose, or throat.
• Be careful when connecting service
equipment.
•Do not breathe refrigerant or vapor. ...
 System Charging
• Air conditioning refrigerant or lubricant vapor can
irritate your eyes, nose, or throat.
• Be careful when connecting service equipment.
• Do not breathe refrigerant or vapor.
...
See also:
Wheel and Tire Specifications
Wheels
4-cylinder models:
17 x 7 1/2J
V6 models:
18 x 8J
Tires
4-cylinder models:
P225/50R17 93V
V6 models:
P235/45R18 94V ...
Clutch Interlock Switch
Replacement
M/T model
1, Disconnect the clutch interlock switch connector (A).
2. Loosen the locknut (B), then remove the clutch
interlock switch (C).
3. Install the clutch interlock switch, and adjust th ...
Vanity Mirror
To use the vanity mirror on the back
of the sun visor, pull up the cover.
The vanity mirror lights come on
when you pull up the cover. ...