 Honda Accord: Trim Removal/Installation - Trunk Area
Special Tools Required
KTC Trim Tool Set SOJATP2014*
* Available through the Honda Tool and Equipment Program; call 888-424-6857
NOTE: - Put on gloves to protect your hands.
- Take care not to bend or scratch the trim or the panels.
- Use the appropriate tool from the KTC trim tool set to avoid damage when removing components.
1. Fold down the rear seat-back.
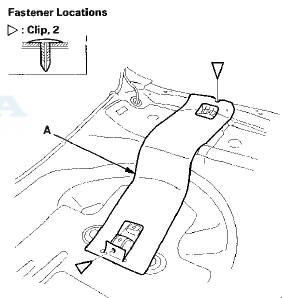
2. Remove the clip that secures the trunk floor (A) and the seat-back cover (B) to the body. 2-door is shown; 4-door is similar.
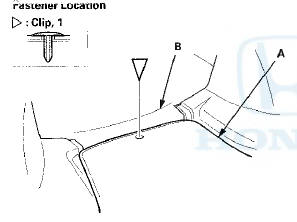
3. Remove the trunk floor (A). 4-door is shown; 2-door is similar.
4. Remove the trunk lid weatherstrip near the trunk rear trim panel.
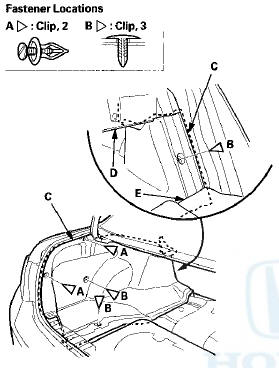
5. Detach the clips (A, B), and release the hooks (C) and the tabs (D) by pulling up the rear trim panel (E), then lemove the panel.
2-door
4-door
6. Detach the clips (A, B), and pull out the trunk side trim panel (C) from under the rear shelf (D) and the rear seat-back (E), then remove the panel. 4-door is shown; 2-door is similar.
7. Remove the tool box spacer (A). 4-door is shown; 2-door is similar.
8. Remove the spare tire.
9. Detach the clips, then remove the spare tire pan carpet (A). 4-door is shown; 2-door is similar.
10. Detach the clips (A) and the harness holders (B) from the stud bolts, then remove the rear wheelhouse insulator (C). 4-door is shown; 2-door is similar.

11. Install the trim in the reverse order of removal, and note these items: - If the clips are damaged or stress-whitened, replace them with new ones.
- Push the clips and the hooks into place securely.
 Trim Removal/Installation - Rear Shelf Area
Special Tools Required
KTC Trim Tool Set SOJATP2014*
*Available through the Honda Tool and
Equipment
Program; call 888-424-6857
Rear Shelf
SRS components are located in this area. Review the
S ...
 Trim Removal/Installation - Trunk
Lid
Trim Removal/Installation - Trunk
Lid
Special Tools Required
KTC Trim Tool Set SOJATP2014*
*Available through the Honda Tool and
Equipment
Program; call 888-424-6857
NOTE:
- Put on gloves to protect your hands. .
- Take care not ...
See also:
Seat Belt Maintenance
For safety, you should check the
condition of your seat belts regularly.
Pull each belt out fully, and look for
frays, cuts, burns, and wear. Check
that the latches work smoothly and
the belt ...
Transmission Range Switch Test
1. Raise the vehicle on a lift, or apply the parking brake,
block the rear wheels, and raise the front of the
. vehicle. Make sure it is securely supported.
2. Remove the left front wheel.
3. ...
Trunk Lower Trim Replacement
4-door
NOTE:
- Put on gloves to protect your hands.
- Take care not to scratch the trunk lid.
1. Remove the license plate from the trunk lid.
2. Remove the clips fastening the trunk lower t ...