 Honda Accord: System Charging
• Air conditioning refrigerant or lubricant vapor can irritate your eyes, nose, or throat.
• Be careful when connecting service equipment.
• Do not breathe refrigerant or vapor.
NOTE: • If accidental system discharge occurs, ventilate the work area before resuming service.
• Additional health and safety information may be obtained from the refrigerant and lubricant manufacturers.
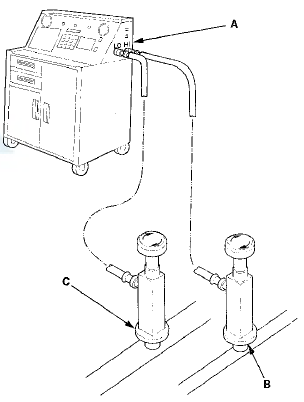
1. Connect an R-134a refrigerant recovery/recycling/charging station (A) to the high-pressure service port (B) and the low-pressure service port (C), as shown, following the equipment manufacturer's instructions.
2. Recover the refrigerant in the A/C system (see page 21-80).
3. Evacuate the system until the suction gauge reads approximately - 9 3 . 3 kPa ( - 7 00 mmHg, -27.6 inHg).
Check that the system holds a vacuum for 15 minutes.
• If the A/C system hold vacuum for 15 minutes, the system does not have a leak. Finish the system evacuation (see page 21-80), then go to step 4.
• If the A/C system does not hold vacuum for 15 minutes, the A/C system has a leak. Find and repair the leak (see page 21-82).
4. Add the same amount of new refrigerant oil to the system that was removed during recovery. Use only DENSO ND-OIL 8 refrigerant oil.
5. Charge the system with the specified amount of R-134a refrigerant. Do not overcharge the system; the A/C compressor will be damaged.
Select the appropriate units of measure for your refrigerant charging station.
Refrigerant Capacity:
400 to 450 g
0.40 to 0.45 kg
0.9 to 1.0 lbs
14.1 to 15 J oz
6. Check for refrigerant leaks (see page 21-82).
7. Check the system performance (see page 21-89).
 System Evacuation
• Air conditioning refrigerant or lubricant v a p o r c an
irritate your eyes, nose, or throat.
•Be careful when connecting service
equipment.
• Do not breathe refrigerant or v ...
 Refrigerant Leak Check
Special Tools Required
• Leak Detector YGK-H-10PM*
• Leak Detector HLD-100*
• Leak Detector TIFZX-1*
• OPTIMAX Jr. A/C Leak Detection Kit TRP124893*
*Available through the Hon ...
See also:
Side Airbag Replacement
NOTE: If replacing the side airbag after deployment,
refer to Component Replacement/Inspection After
Deployment (see page 24-208) for a complete list of
other parts that must also be replaced.
Rem ...
Towing
If the vehicle needs to be towed, call a professional
towing service. Never tow the vehicle behind another
vehicle with just a rope or chain It is very dangerous.
Emergency Towing
There are three ...
Rear Brake Caliper Overhaul
Frequent inhalation of brake pad dust, regardless of material composition,
could be hazardous to your health.
- Avoid breathing dust particles.
- Never use an air hose or brush to clean brake ...