 Honda Accord: Auto Door Unlocking
The auto door unlocking feature has five possible settings:
The auto door unlocking is deactivated all the time.
On A/T vehicles, the driver’s door unlocks when you move the shift lever to the Park (P) position with the brake pedal depressed.
This is the default setting.
Both doors unlock when you move the shift lever to the Park (P) position with the brake pedal depressed (A/T vehicles).
The driver’s door unlocks whenever you turn the ignition switch to the ACCESSORY (I) position.
This is the default setting on M/T vehicles.
Both doors unlock whenever you turn the ignition switch to the ACCESSORY (I) position.
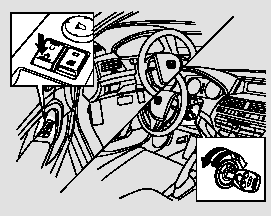
To turn off the Auto Door Unlock modes:

1. Make sure the shift lever is in the Park (P) position (A/T vehicles).
2. Turn the ignition switch to the ON (II) position, and open the driver’s door.
3. Push and hold the rear of the master door lock switch on the driver’s door. You will hear a click, and after about 5 seconds, you will hear another click.
4. Release the switch, and within 20 seconds, turn the ignition switch to the LOCK (0) position.
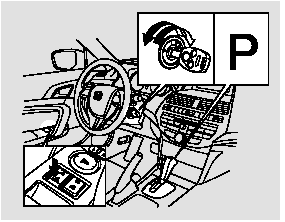
To program the Park Unlock mode:
Unlocks the driver’s door or both doors when the shift lever is moved into the Park (P) position with the brake pedal depressed (A/T vehicles only).

1. Make sure the shift lever is in the Park (P) position.
2. Turn the ignition switch to the ON (II) position, and make sure to close the driver’s door.
3. Push and hold the rear of the master door lock switch on the driver’s door. You will hear a click.
Continue to hold the switch:
Until you hear another click (after about 5 seconds) to activate driver’s door unlock feature.
Or, until you hear two more clicks (after about 10 seconds) to activate both doors unlock feature.
4. Release the switch, and within 20 seconds, turn the ignition switch to the LOCK (0) position.
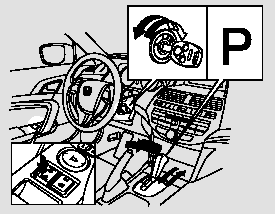
To program the Ignition Switch Unlock mode:
Unlocks the driver’s door or both doors when the ignition switch is moved out of the ON (II) position.

1. Make sure the shift lever is in the Park (P) position (A/T vehicles).
2. Turn the ignition switch to the ON (II) position, and make sure to close the driver’s door.
3. On A/T vehicles, push and hold the brake pedal, then move the shift lever out of the Park (P) position.
4. Push and hold the rear of the master door lock switch on the driver’s door. You will hear a click.
Continue to hold the switch:
Until you hear another click (after about 5 seconds) to activate driver’s door unlock feature.
Or, until you hear two more clicks (after about 10 seconds) to activate both doors unlock feature
5. Release the switch, and within 20 seconds, turn the ignition switch to the ACCESSORY (I) position.
On A/T vehicles, move the shift lever to the Park (P) position.
6. Turn the ignition switch to the LOCK (0) position.
Even if your vehicle’s battery is removed or goes dead, the system keeps the auto door lock/unlock setting which you selected.
 Auto Door Locking
The auto door locking feature has
three possible settings:
The auto door locking is
deactivated all the time.
The doors lock whenever you
move the shift lever out of the
Park (P) position (A ...
 Remote Transmitter
LOCK - Press this button once to
lock both doors. Some exterior lights
will flash once. When you push
LOCK twice within 5 seconds, you
will hear a beep to verify that the
doors are locked ...
See also:
Trunk Lid Dynamic Damper
Replacement
2-door
NOTE: Take care not to scratch the trunk lid.
1. Remove the cover (A) by releasing the hooks (B).
Remove the bolts, and detach the clips, then remove
the trunk lid dynamic damper bracke ...
Using the Remote Transmitter
Press the trunk release button for
approximately one second to unlock and open
the trunk.
...
Brake System Inspection and Test
Inspect the brake system components listed. Repair or replace any parts that
are leaking or damaged.
Component Inspections:
Brake System Test
Brake pedal sinks/fades when braking
1. Set the pa ...
