
 Honda Accord: Mainshaft Inspection
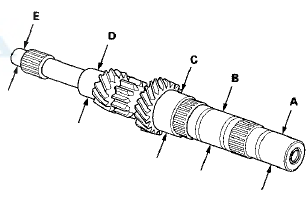
1. Inspect the gear and bearing contact areas for wear and damage, then measure the mainshaft at points A, B, C, D, and E. If any part of the mainshaft is less than the service limit, replace it.
Standard:
A Ball Bearing Contact Area
(Transmission Housing Side): 27.987-28.000 mm (1.1018-1.1024 in)
B 4th/5th Gear Distance Collar Contact Area: 31.984-32.000 mm (1.2592-1.2598 in)
C Needle Bearing Contact Area: 38.984-39.000 mm (1.5348-1.5354 in)
D Ball Bearing Contact Area (Clutch Housing Side): 27.977-27.990 mm (1.1015-1.1020 in)
E Bushing Contact Area: 20.80-20.85 mm (0.819-0.821 in)
Serwice Limit:
A: 27.93 mm (1.100 in)
B: 31.93 mm (1.257 in)
C: 38.93 mm (1.533 in)
D: 27.92 mm (1.099 in)
E: 20.75 mm (0.817 in)
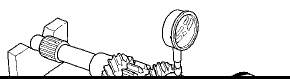
2. Inspect the runout by supporting both ends of the mainshaft. Then rotate the mainshaft two complete turns while measuring with a dial gauge. If the runout exceeds the service limit, replace the mainshaft.
Standard: 0.02 mm (0.001 in) max.
Service Limit: 0.05 mm (0.002 in)
 Mainshaft Disassembly
NOTE: Refer to the Exploded View in the Mainshaft
Reassembly, as needed, when removing components
pressed onto the mainshaft (see page 13-38).
1. Remove the angular ball bearing (A) and the taper ...
 Mainshaft Reassembly
Exploded View
*: The components of the double cone synchro assembly.
Special Tools Required
- Driver Handle, 40 mm I.D. 07746-0030100
-СћBearing Driver Attachment, 30 mm
07746-0030300
NOTE: ...
See also:
Fluid Replacement
Check the reservoir (A) at regular intervals, and add the
recommended fluid as necessary. Always use Honda
Power Steering Fluid. Using any other type of power
steering fluid or automatic transmissi ...
Emissions Controls
The burning of gasoline in your
vehicle’s engine produces several byproducts.
Some of these are carbon
monoxide (CO), oxides of nitrogen
(NOx), and hydrocarbons (HC).
Gasoline evaporating fr ...
Protecting Children - General Guidelines
Children depend on adults to protect
them. However, despite their best
intentions, many adults do not know
how to properly protect child
passengers.
If you have children, or ever need to
...