 Honda Accord: Mainshaft Disassembly
NOTE: Refer to the Exploded View in the Mainshaft Reassembly, as needed, when removing components pressed onto the mainshaft (see page 13-38).
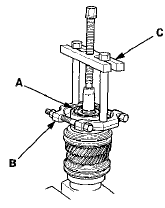
1. Remove the angular ball bearing (A) and the tapered cone ring using a commercially available bearing separator (B) and a commercially available bearing puller (C). Make sure the bearing separator is under the tapered cone ring.
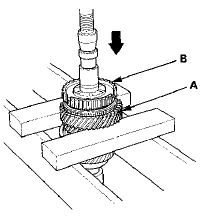
2. Support 5th gear (A) on steel blocks, and press the mainshaft out of the 5th synchro hub (B) and 5th gear.
NOTE: Do not use a jaw-type puller; it can damage the gear teeth.
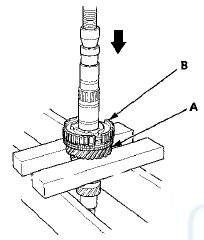
3. Support 3rd gear (A) on steel blocks, and press the mainshaft out of the 3rd/4th synchro hub (B) and 3rd gear.
NOTE: Do not use a jaw-type puller; it can damage the gear teeth.
 Mainshaft Assembly Clearance Inspection
1. Support the bearing Inner race with an appropriate
sized socket ( A ) , and push down on the mainshaft ( B ) .
2. Measure the clearance between 2nd gear (C) and 3rd
gear (D) with a feeler gaug ...
 Mainshaft Inspection
1. Inspect the gear and bearing contact areas for wear
and damage, then measure the mainshaft at points A,
B, C, D, and E. If any part of the mainshaft is less than
the service limit, replace it.
...
See also:
Front HFL-Navigation-ANC
Microphone
Removal/Installation
NOTE:
• Put on gloves to protect your hands.
• Take care not to scratch the dashboard and related
parts.
• Lay a workshop towel under the parts when working
on them to protect ...
Transmitter Test
NOTE:
• If the doors unlock or lock with the
transmitter, but the
LED on the transmitter does not come on, the LED is
faulty; replace the transmitter.
• If any door is open, you cann ...
Front Passenger's Airbag Replacement
NOTE: If r e p l a c i n g t h e f r o n t passenger's airbag after
d e p l o y m e n t , refer t o Component Replacement/
Inspection A f t e r Deployment (see page 24-208) f o r a
c o m p l e t e ...