
 Honda Accord: Receiver/Dryer Desiccant
Replacement
Honda Accord: Receiver/Dryer Desiccant
Replacement
NOTE: Install the receiver/dryer as quickly as possible to prevent the system from absorbing moisture from the air.
1. Remove the A/C condenser (see page 21 -77).
2. Remove the bolts from the A/C condenser, then remove the receiver/dryer (A), the bracket (B), and the O-rings (C).
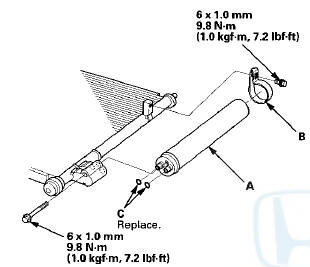
3. Install the receiver/dryer in the reverse order of removal. Replace the O-rings with new ones, and apply a thin coat of refrigerant oil (DENSO ND-OIL 8) before installing them. Be sure to use the correct O-rings for HFC-134a (R-134a) to avoid leakage.
 A/C Condenser Replacemen
1. Recover the refrigerant with a recovery/recycling
charging station (see page 21-80).
2. Remove the front grille cover (see page 20-274).
3. Remove the intake air duct and the water separator ...
 Dust and Pollen Filter Replacement
1. Open the glove box. Remove the glove box stop on
the right side, then let the glove box hang down (see
page 20-174).
2. Remove the dust and pollen filter assembly (A) from
the blower unit.
...
See also:
A/C Pressure Switch Circuit
Troubleshooting
NOTE:
• if the blower motor does not run at all speeds, the A/C
compressor will be inoperative. Run the
self-diagnostic function, and check for DTC B1241.
Before performing any other troubl ...
Trunk Lid Weatherstrip Replacement
NOTE: 4-door Is shown; 2-door Is similar.
1. Remove the trunk lid weatherstrip (A) by pulling it off.
2. Locate the painted alignment mark (B or C) on the
trunk lid weatherstrip. Align the pain ...
DTC Troubleshooting
DTC indicator A: Climate Control Unit Internal
Error
NOTE: Check the battery condition (see page 22-90) and
the charging system (see page 4-25).
1. Turn the ignition switch to LOCK (0), and then ...