 Honda Accord: A/C Condenser Replacemen
1. Recover the refrigerant with a recovery/recycling charging station (see page 21-80).
2. Remove the front grille cover (see page 20-274).
3. Remove the intake air duct and the water separator (see page 10-13).
4. Remove the clips (A) and the duct (B). Remove the bolts and the radiator upper mount brackets (C).
5. Remove the bolt, then disconnect the receiver pipe (A) from the A/C condenser.
6. Remove the bolt, then disconnect the discharge hose (A) from the A/C condenser.
7. Remove the coolant reservoir (A).
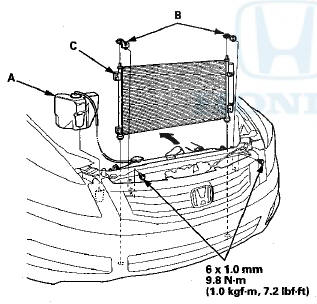
8. Remove the bolts, then remove the A/C condenser upper mount brackets (B). Remove the A/C condenser (C) by lifting it up. Be careful not to damage the radiator or condenser fins when removing the A/C condenser.
9. Install the A/C condenser in the reverse order of removal, and note these items: • If you're installing a new A/C condenser, add refrigerant oil (DENSO ND-OIL8) (see page 21-6).
• Replace the O-rings with new ones at each fitting, and apply a thin coat of refrigerant oil before installing them. Be sure to use the correct O-rings for HFC-134a (R-134a) to avoid leakage.
• Immediately after using the oil, reinstall the cap on the container, and seal it to avoid moisture absorption.
• Do not spill the refrigerant oil on the vehicle; it may damage the paint; if the refrigerant oil contacts the paint, wash it off immediately.
• Be careful not to damage the radiator or the A/C condenser fins when installing the A/C condenser.
• Charge the system (see page 21-81).
 A/C Compressor Relief Valve
Replacement
A/C Compressor Relief Valve
Replacement
1. Recover the refrigerant with a
recovery/recycling/charging station (see page 21-80).
2. Raise the vehicle on a lift.
3. Remove the relief valve (A) and the O-ring (B). Plug
the opening to k ...
 Receiver/Dryer Desiccant
Replacement
Receiver/Dryer Desiccant
Replacement
NOTE: Install the receiver/dryer as quickly as possible to
prevent the system from absorbing moisture from the
air.
1. Remove the A/C condenser (see page 21 -77).
2. Remove the bolts from the ...
See also:
Component Replacement/Inspection After
Deployment
NOTE:
• Before doing any SRS repairs, check the DTCs (see
page 24-36) for the less o b v i o u s deployed
components (seat belt t e n s i o n e r s , front impact
sensors, side airbag sensors ...
Washer Reservoir Replacement
1. Remove the right inner fender (see page 20-290).
2. Disconnect the 2P connector(s) (A) from the washer
motor (B) and the washer fluid level switch (Canada
models).
Washer Reservoir Capacity:
...
Rear Inner Fender Replacement
NOTE: Take care not to scratch the rear bumper or the
body.
1. Remove the screws, then remove the rear inner
fender (A) from the rear bumper (B) and the body.
2. Install the inner fender in th ...