 Honda Accord: Bulb Replacement
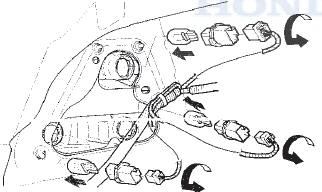
Headlight (High'Beam)
1. Disconnect the 2P connector (A) from the headlight
Headlight (High Beam): 60 W
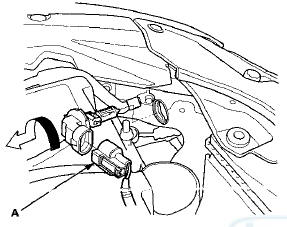
2. Turn the bulb socket 45 В° counterclockwise to remove the bulb.
3. Install a new bulb in the reverse order of removal.
Headlight (Low Beam)
1. Remove the inner fender (see page 20-290).
2. Disconnect the 2P connector (A) from the headlight.
Headlight (Low Beam):
51 W (4-door)
55 W (2-door)
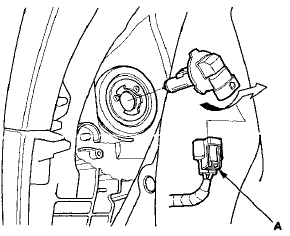
3. Turn the bulb socket 45 В° counterclockwise to remove the bulb.
4. Install a new bulb in the reverse order of removal.
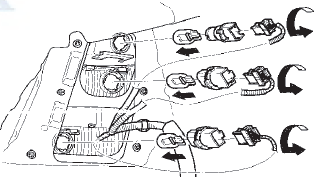
Front Turn Signal/Parking Lights
1. Disconnect the 3P connector (A) from the front turn signal/parking lights.
Front Turn Signal/Parking Lights:
21/5 W (4-door)
24/2.2 CP (2-door)
NOTE: The illustration shows 4-door.
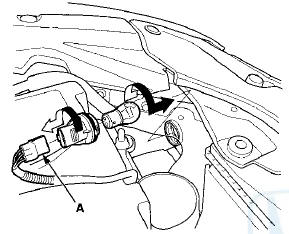
2. Turn the bulb socket 45 В° counterclockwise to remove the bulb.
3. Install a new bulb in the reverse order of removal.
Front Side Marker Light
1. Remove the inner fender (see page 20-290).
2. Disconnect the 2P connector (A) from the front side marker light.
Front Side Marker Light: 3 CP
NOTE: The illustration shows 4-door.
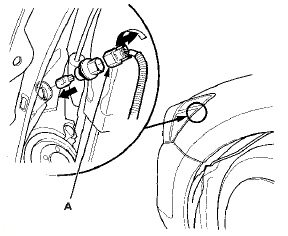
3. Turn the bulb socket 45 В° counterclockwise to remove the bulb.
4. Install a new bulb in the reverse order of removal.
Taillights (4-door)
1. Open the trunk lid, and remove the trunk side trim panel (see page 20-132).
2. Disconnect the connectors from the lights.
Brake Lights/TaiIIights:21/5 W
Rear Turn Signal Light; 21 W
Back-up light: 21 W
3. Turn the bulb socket 45 В° counterclockwise to remove the bulb.
4. Install new bulb(s) in the reverse order of removal.
Taillights (2-door)
1. Open the trunk lid, and remove the trunk side trim panel (see page 20-132).
2. Disconnect the connectors from the lights.
Brake Lights/Taillights:21/5 W
Rear Turn Signal Light: 21 W
Back-up Light: 21 W
3. Turn the bulb socket 45 В° counterclockwise to remove the bulb.
4. Install new bulb(s) in the reverse order of removal.
 Headlight Replacement
4-door
1. Remove the parts shown.
• Upper fender trim (see page 20-277)
• Front bumper (see page 20-255)
• Front bumper absorber (see page 20-255)
2. Remove the three bolts, and ...
 Taillight Replacement
4-door
1 Remove the rear bumper (see page 20-260).
2. Remove the trunk side trim panel (see page 20-132).
3. Disconnect the connectors (A) from the taillights (B).
4 . Turn the bulb sockets ...
See also:
To Use Maintenance MinderTM
• Displaying the Engine Oil Life
1. Turn the ignition switch to ON
.
2. Press the (Select/Reset) knob
repeatedly
until the engine oil life appears on the
information display.
The Maint ...
Dashboard
With Navigation System
Without Navigation System
...
Circuit Diagram
...