 Honda Accord: Headlight Replacement
4-door
1. Remove the parts shown.
• Upper fender trim (see page 20-277) • Front bumper (see page 20-255) • Front bumper absorber (see page 20-255) 2. Remove the three bolts, and pull the headlight (A) out slightly.
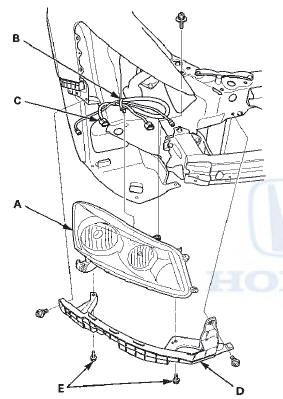
3. Remove the harness clip (B) from the headlight housing, and disconnect the connectors (C) from the bulb sockets.
4. Remove the headlight with the corner upper beam (D).
NOTE: Be careful not to scratch the headlight lens and the fender.
5. Remove the two bolts (E) and the corner upper beam from the headlight 6. Install the headlight in the reverse order of removal.
7. After replacement, adjust the headlight (see page 22-233).
2-door
1. Remove the parts shown.
•Upper fender trim (see page 20-277) • Front bumper (see page 20-255) • Front bumper absorber (see page 20-255) 2. Remove the three bolts, and pull the headlight (A) out slightly.
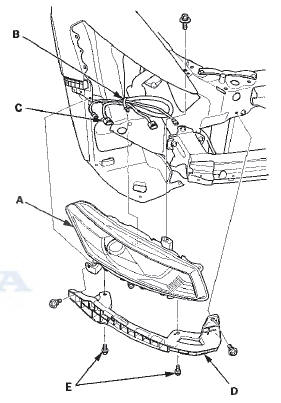
3. Remove the harness clip (B) from the headlight housing, and disconnect the connectors (C) from the bulb sockets.
4. Remove the headlight with the corner upper beam (D).
NOTE: Be careful not to scratch the headlight lens and the fender.
5. Remove the two bolts (E) and the corner upper beam from the headlight 6. Install the headlight in the reverse order of removal.
7. After replacement, adjust the headlight (see page 22-233).
 Headlight Adjustment
Headlights become very hot during use; do not touch
them or any attaching hardware immediately after
they have been turned off.
Before adjusting the headlights:
• Park the vehicle on a level ...
 Bulb Replacement
Headlight (High'Beam)
1. Disconnect the 2P connector (A) from the headlight
Headlight (High Beam): 60 W
2. Turn the bulb socket 45 В° counterclockwise to remove
the bulb.
3. Install a new b ...
See also:
Trunk Lower Trim Replacement
4-door
NOTE:
- Put on gloves to protect your hands.
- Take care not to scratch the trunk lid.
1. Remove the license plate from the trunk lid.
2. Remove the clips fastening the trunk lower t ...
GPS Antenna
Removal/Installation
1. Remove the rear shelf (see page 20-128).
2. Disconnect the GPS antenna connector (A), and
remove the bolt (B).
3. Detach the harness clips, and remove the GPS
antenna (C).
4. Install the ...
Steering Column Removal and Installation
SRS components are located in this area. Review the
SRS component locations: 4-door (see page 24-21 )f
2-door (see page 24-23) and the precautions and
procedures (see page 24-25) before doing repai ...