 Honda Accord: B-CAN System Diagnosis Test Mode
B
Honda Accord: B-CAN System Diagnosis Test Mode
B
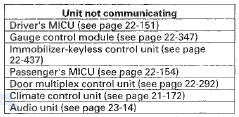
Do this diagnosis if any of the control units are not communicating (Not Available is displayed in the HDS) as found by the B-CAN System Diagnosis Test Mode A (see page 22-134).
1. Using the HDS, select the system that has the symptom from the BODY ELECTRICAL menu.
2. Select DTCs, and then check for loss of communication DTCs.
Are any loss of communication DTCs indicated? YES-Go to step 3.
NO-Faulty driver's MICU; replace the driver's under-dash fuse/relay box, USA models (see page 22-86), Canada models (see page 22-87).
3. Do the power, ground, and communication part of the input test for the unit(s) not communicating with the HDS.
 Troubleshooting
B-CAN System Diagnosis Test Mode
A
Troubleshooting
B-CAN System Diagnosis Test Mode
A
Check the ECM/PCM for DTCs and troubleshoot .
ECM/PCM (see page 11-3) or F-CAN loss of
communication errors first, then do this diagnosis if the
symptom is related to the B-CAN system.
1. Comp ...
 B-CAN System Diagnosis Test Mode
C
B-CAN System Diagnosis Test Mode
C
Do this diagnosis if a component that is controlled by the
B-CAN system does not stop or turn off.
NOTE:
• If the component does not turn on, go to B-CAN
System Diagnosis Test Mode D {see p ...
See also:
Rear Brake Caliper Overhaul
Frequent inhalation of brake pad dust, regardless of material composition,
could be hazardous to your health.
- Avoid breathing dust particles.
- Never use an air hose or brush to clean brake ...
Protecting Discs
For information on how to handle
and protect compact discs. ...
Ignition Switch
WARNING
Removing the key from the ignition switch
while driving locks the steering. This can
cause you to lose control of the vehicle.
Remove the key from the ignition switch
only when p ...