 Honda Accord: Side Impact Sensor (First) Replacement
4-Door
Removal
1. Do t h e battery t e r m i n a l d i s c o n n e c t i o n procedure (see page 22-91), t h e n w a i t at least 3 m i n u t e s before s t a r t i ng work.
2. Remove t h e B-pillar l o w e r t r im (see page 20-110).
3. Disconnect t h e SRS f l o o r w i r e harness 2P connector (A) from t h e side impact sensor (first) (B).
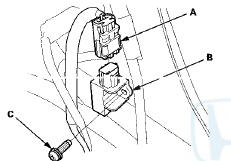
4. Remove t h e TORX bolt (C) u s i n g a TORX T30 b i t , t h en remove t h e side impact sensor (first).
Installation
1. Install t h e s i de impact sensor (first) (A) w i t h a n ew TORX bolt (B), u s i n g a TORX T30 bit. Connect t h e SRS f l o o r w i r e harness 2P connector (C) t o t h e side impact sensor (first).
2. Do t h e battery t e r m i n a l reconnection procedure (see page 22-91).
3. Clear any DTCs w i t h t h e HDS (see page 24-38).
4. C o n f i rm proper SRS o p e r a t i o n : T u r n t h e i g n i t i on s w i t c h t o O N (II); t h e SRS i n d i c a t o r s h o u l d c o m e on f o r about 6 seconds and t h e n g o off.
5. Reinstall all r e m o v e d parts.
2-Door
Removal
1. Do the battery terminal disconnection procedure (see page 22-91), then wait at least 3 minutes before, starting work.
2. Remove the door sill trim (see page 20-105).
• 4-door (see page 20-107) • 2-door (see page 20-105) 3. Turn over the rear portion of the carpet as needed.
4. Disconnect the SRS floor wire harness 4P connector (A), from the side impact sensor (first) (B).
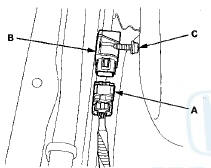
5. Remove the TORX bolt (C) using a TORX T30 bit, then remove the side Impact sensor (first).
Installation
1. Install the side impact sensor (first) (A) with a n ew TORX bolt (B), using a TORX T30 bit. Connect the SRS floor wire harness 4P connector (C) to t h e side impact sensor (first).
2. Do the battery terminal reconnection procedure (see page 22-91).
3. Clear any DTCs with the HDS (see page 24-38).
4. Confirm proper SRS operation: Turn the ignition switch to ON (II); the SRS indicator should come on for about 6 seconds and then go off.
5. Reinstall all removed parts.
 SRS Unit Replacement
Removal
1. Do t h e b a t t e r y t e r m i n a l d i s c o n n e c t i o n procedure
(see
page 22-91), t h e n w a i t at least 3 m i n u t e s before
s t a r t i n g work.
2. Remove t h e d ...
 Side Impact Sensor (Second) Replacement
4-Door
Removal
1. Do t h e b a t t e r y t e r m i n a l d i s c o n n e c t i o n procedure
(see
page 22-91), t h e n w a i t at least 3 m i n u t e s before
s t a r t i ng work.
2. Remove t ...
See also:
Disc Changer Error Messages (Models with navigation system)
The chart on the right explains the
error messages you may see in the
center display while playing a disc.
If you see an error message in the
center display while playing a disc,
press the ej ...
Transmission Fluid
• Continuously Variable Transmission (CVT) Fluid
Have a dealer check the fluid level and replace if necessary.
NOTICE
Do not mix HCF-2 with other transmission fluids.
Using a transmission ...
Transmission End Crankshaft Oil
Seal Installation - In Car.
Special Tools Required
Driver Handle, 15 x 135L 07749-0010000
Oil Seal Driver Attachment, 96 mm 07ZAD-PNAA100
1 Remove the transmission:
- Manual transmission (see page 13-7)
- Automatic transmis ...