 Honda Accord: Side Impact Sensor (Second) Replacement
4-Door
Removal
1. Do t h e b a t t e r y t e r m i n a l d i s c o n n e c t i o n procedure (see page 22-91), t h e n w a i t at least 3 m i n u t e s before s t a r t i ng work.
2. Remove t h e seat s i de bolster (see page 20-242).
3. Disconnect t h e SRS f l o o r w i r e harness 2P c o n n e c t o r (A) f r om t h e s i de impact sensor (second) (B).
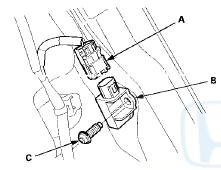
4. Remove t h e TORX bolt (C) u s i n g a TORX T30 b i t , t h en remove t h e s i de i m p a c t sensor (second).
Installation
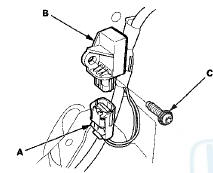
1. Install t h e s i d e impact sensor (second) (A) w i t h a n e w TORX bolt (B), u s i n g a TORX T30 bit. Connect t h e SRS f l o o r w i r e harness 2P c o n n e c t o r (C) t o t h e s i de impact sensor (second).
2. Do t h e b a t t e r y t e r m i n a l reconnection procedure (see page 22-91).
3. Clear a n y DTCs w i t h t h e HDS (see page 24-38).
4. C o n f i rm proper SRS o p e r a t i o n : T u r n t h e i g n i t i on s w i t c h t o O N (II); t h e SRS indicator s h o u l d come on f o r about 6 seconds and t h e n g o off.
5. Reinstall all r e m o v e d parts.
2-Door
Removal
1. Do t h e battery t e r m i n a l disconnection procedure (see page 22-91), t h e n w a i t at least 3 m i n u t e s before s t a r t i ng work.
2. Remove t h e rear s i d e t r im panel (see page 20-127).
3. Disconnect t h e SRS f l o o r w i r e harness 2P connector (A) from the side impact sensor, (second) (B).
4. Remove t h e TORX b o l t (C) u s i n g a TORX T30 b i t , t h en remove t h e side impact sensor (second).
Installation
1. Install t h e s i de impact sensor (second) (A) w i t h a n ew TORX bolt (B), u s i n g a TORX T30 bit. Connect t h e SRS f l o o r w i r e harness 2P connector (C) t o t h e side impact sensor (second).
2. Do t h e battery t e r m i n a l reconnection procedure (see page 22-91).
3. Clear any DTCs w i t h t h e HDS (see p a g e 24-38).
4. C o n f i rm proper SRS o p e r a t i o n : T u r n t h e i g n i t i on s w i t c h t o O N (II); t h e SRS indicator s h o u l d c o m e on f o r about 6 seconds a n d t h e n g o off.
5. Reinstall all r e m o v e d parts.
 Side Impact Sensor (First) Replacement
4-Door
Removal
1. Do t h e battery t e r m i n a l d i s c o n n e c t i o n procedure (see
page 22-91), t h e n w a i t at least 3 m i n u t e s before
s t a r t i ng work.
2. Remove t h e B-p ...
 Rear Safing Sensor Replacement
Removal
1. Do the battery t e r m i n a l disconnection p r o c e d u r e (see
page 22-91), t h e n wait at least 3 minutes before
starting w o r k .
2. Remove t h e rear seat c u s h i o n (see ...
See also:
Piston Ring Replacement
1. Remove the piston from the engine block (see page
7-14).
2. Using a ring expander (A), remove the old piston
rings (B).
3. Clean all ring grooves thoroughly with a squared-off
broken ring ...
Hard Disc Drive (HDD) Audio
If an error occurs while playing the Hard Disc Drive (HDD) Audio, you may see
the
following error messages. If you cannot clear the error message, contact a
dealer.
iPod®/USB Flash Drive
If ...
Oil Check
We recommend that you check the engine oil level every time you refuel.
Park the vehicle on level ground.
Wait approximately three minutes after turning the engine off before you
check
the oil ...