 Honda Accord: Driver's Inner Middle Pad
Removal/Installation
Honda Accord: Driver's Inner Middle Pad
Removal/Installation
Special Tools Required
KTC Trim Tool Set SOJATP2014*
* Available through the Honda Tool and Equipment Program; call 888-424-6857
NOTE: -Take care not to scratch the dashboard or the related parts.
- Use the appropriate tool from the KTC trim tool set to avoid damage when removing components.
1. Remove these items: - Center pocket: - Without navigation system (see page 20-168) -With navigation system (see page 20-169) - Driver's inner dashboard trim (see page 20-167) - Passenger's dashboard trim (see page 20-173) - Dashboard center vent (with navigation system) (see page 20-178) - Audio-HVAC module: - Without navigation system (see page 23-115) - With navigation system (see page 21-190) 2. Gently pull out along the edge of the driver's inner middle pad (A) to release the hooks (B)r then remove the pad.
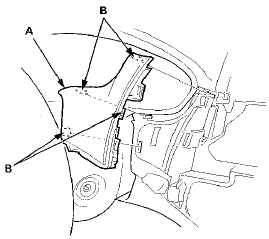
3. Install the pad in the reverse order of removal, and push the hooks into place securely.
 Driver's Outer Middle Pad
Removal/Installation
Driver's Outer Middle Pad
Removal/Installation
Special Tools Required
KTC Trim Tool Set SOJATP2014*
*Available through the Honda Tool and
Equipment
Program; call 888-424-6857
NOTE:
- Take care not to scratch the dashboard or the related
pa ...
 Passenger's Middle Pad
Removal/Installation
Passenger's Middle Pad
Removal/Installation
Special Tools Required
KTC Trim Tool Set SOJATP2014*
*Available through the Honda Tool and
Equipment
Program; call 888-424-6857
SRS components are located in this area. Review the
SRS component ...
See also:
Symptom Troubleshooting Index
...
Tire and Wheel Replacement
Replace your tires with radials of the same size, load range, speed rating,
and
maximum cold tire pressure rating (as shown on the tire’s sidewall). Using tires
of a
different size or constr ...
Gearshift Mechanism Replacement
NOTE: Make sure not to get any silicone grease on the terminal part of the
connectors and switches, especially if you
have silicone grease on your hands or gloves.
...