 Honda Accord: Shift Lock Solenoid Replacement
Type A Shift Lever
1. Remove the shift lever assembly (see page 14-222).
2. Release the lock tabs (A) retaining the shift lock solenoid using thin-bladed screwdrivers.
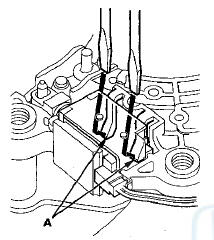
3. Insert a 6.0 mm (0.24 in) pin (A) into the guide hole (B) ('08-09 models), and push the shift lock solenoid (C) out.
'08-09 models
'10 model
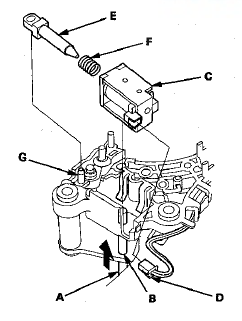
4. Disconnect the shift lock solenoid connector (D).
5. Replace the shift lock solenoid, the solenoid plunger (E), and the plunger spring (F) assembly.
6. Apply silicone grease to the tip (G) of the shift lock stop and the solenoid plunger.
NOTE: Make sure not to get any silicone grease on the terminal part of the connectors and switches, especially if you have silicone grease on your hands or gloves.
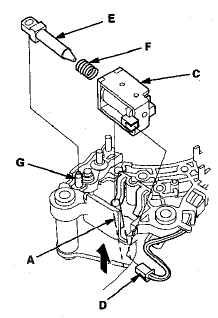
7. Connect the shift lock solenoid connector.
8. Install the shift lock solenoid by aligning the joint of the shift lock solenoid plunger with the tip of the shift lock stop, then push the shift lock solenoid into the shift lever securely.
9. Install the shift lever assembly (see page 14-224).
Type B Shift Lever
1. Remove the shift lever assembly (see page 14-222).
2. Remove the A/T gear position indicator panel from the shift lever (see page 14-228).
3. Remove the shift lock solenoid harness (A) from the harness guides.
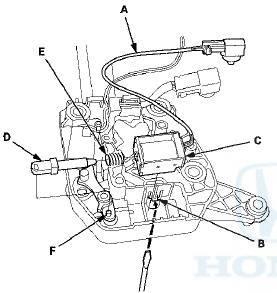
4. Release the lock tab (B) retaining the shift lock solenoid using a thin-bladed screwdriver.
5. Replace the shift lock solenoid (C), the solenoid plunger (D), and the plunger spring (E) assembly.
6. Apply silicone grease to the tip (F) of the shift lock stop and the solenoid plunger.
NOTE: Make sure not to get any silicone grease on the terminal part of the connectors and switches, especially if you have silicone grease on your hands or gloves.
7. Install the shift lock solenoid by aligning the joint of the shift lock solenoid plunger with the tip of the shift lock stop, then push the shift lock solenoid into the shift lever securely.
8. Install the shift lock solenoid harness in the harness guides.
9. Install the A/T gear position indicator panel on the shift lever (see page 14-228).
10. Install the shift lever assembly (see page 14-228).
 Shift Lock Solenoid Test
1. Connect the HDS to the DLC (A) located under the
driver's side of the dashboard.
2. Turn the ignition switch to ON (II). Make sure the HDS
communicates with the PCM. If it does not, go to the
...
 Shift Lock Stop/Shift Lock Stop Cushion
Replacement
Shift Lock Stop/Shift Lock Stop Cushion
Replacement
Type A Shift Lever
1. Remove the shift lock solenoid (see page 14-254).
2. Remove the shift lock stop (A) and the stop cushion
(B) as a set.
3. Apply silicone grease to the pin (C) of the shif ...
See also:
Driveshaft Inspection
1. Check the inboard boot (A) and the outboard boot (B)
on the driveshaft (C) for cracks, damage, leaking
grease, and loose boot bands (D). If any damage is
found, replace the boot and the boot ban ...
Brake Pedal Position Switch Test
1. Disconnect the 4P connector (A) from the brake pedal
position switch (B).
2. Check for continuity between terminals No. 1 and No.
2.
• There should be continuity when the brake pedal ...
Radio Data System (RDS)
On the FM band, you can select a
favorite station and display the
program service name provided by
the radio data system (RDS).
RDS INFO Display
The RDS information display
function shows th ...