 Honda Accord: MICU Input Test
NOTE; Before testing, troubleshoot the multiplex integrated control unit first, using B-CAN System Diagnosis Test Mode A (see page 22-134).
Drivers MICU
1. Turn the ignition switch to LOCK (0), and remove the driver's dashboard lower cover (see page 20-166).
2. Disconnect driver's under-dash fuse/relay box connectors F, Q, and R.
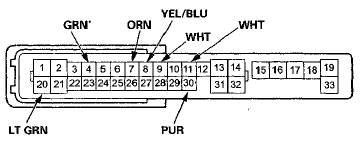
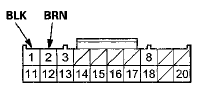
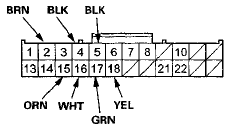
NOTE; AH connector views are wire side of female terminals.
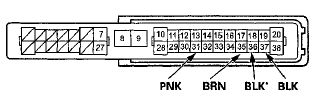
CONNECTOR F (33P)
CONNECTOR Q (20P)
CONNECTOR R (24P)
*: A/T
3. Inspect the connector and socket terminals to be sure they are all making good contact.
• If the terminals are bent, loose or corroded, repair them as necessary and recheck the system.
• If the terminals look OK, go to step 4.
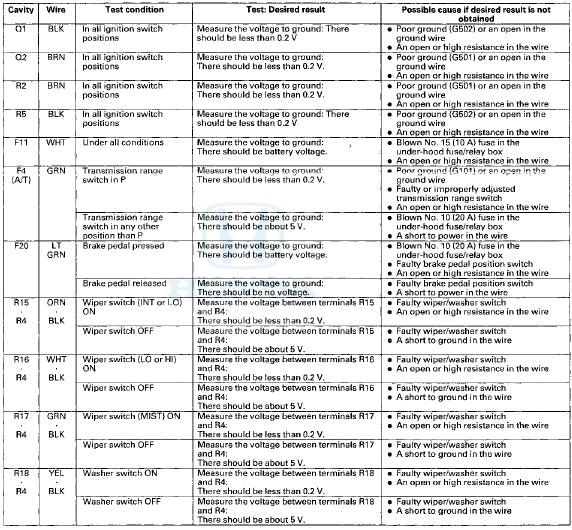
4. With the connectors still disconnected, do these input tests at the following connectors.
• If any test indicates a problem, find and correct the cause, then recheck the system.
• If all the input tests prove OK, go to step 5.
5. Reconnect the connectors to the driver's under-dash fuse/relay box, turn the ignition switch to ON ( I I ) , and do these input tests at the following connectors.
• If any test indicates a problem, find and correct the cause, then recheck the system.
• If all the input tests prove OK, goto step 6.
Passenger's MICU
6. Turn the ignition switch to LOCK (0), and remove the passenger's kick panel.
• 2-door (see page 20-105) • 4-door (see page 20-107)
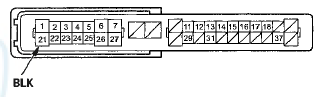
7. Disconnect passenger's under-dash fuse/relay box connectors A, E, G# 1 and H*2.
*1: LX, LX PZEV, LX-P, LX-P PZEV
*2: Except LX, LX PZEV, LX-P, LX-P PZEV
NOTE: AH connector views are wire side of female terminals.
CONNECTOR A (33P)
CONNECTOR E (18P)
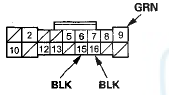
CONNECTOR G(16P) (LX, LX PZEV, LX-P, LX-P PZEV)
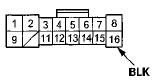
CONNECTOR H (38P) (Except LX, LX PZEV, LX-P)
*: '08-09 models
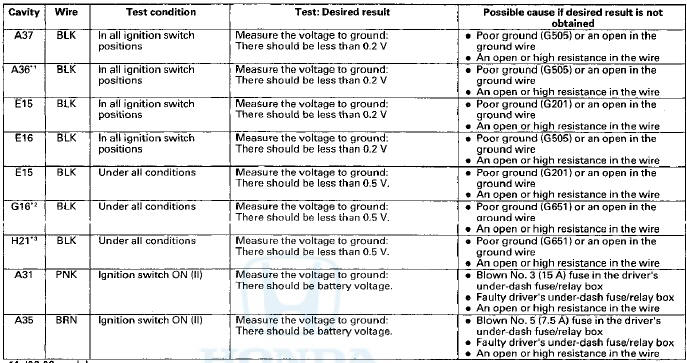
8. With the connectors still disconnected, make these input tests at the connectors.
• If any test indicates a problem, find and correct the cause, then recheck the system.
• If all the input tests prove OK, go to step 9.

9. Reconnect the connectors to the passenger's under-dash fuse/relay box, and do these input tests at the following connectors.
• If any test indicates a problem, find and correct the cause, then recheck the system.
• If all the input tests prove OK, Go to step 10.
* 1 : '08-09 models
*2: LX, LX PZEV, LX-P, LX-P PZEV
*3: Except LX, LX PZEV, LX-P, LX-P PZEV
10. If multiple failures are found on more than one control unit, replace the driver's under-dash fuse/relay box (includes the driver's MICU).
• USA models (see page 22-86) • Canada models (see page 22-87) If input failures are related to a particular control unit, replace the control unit.
 DTC Troubleshooting
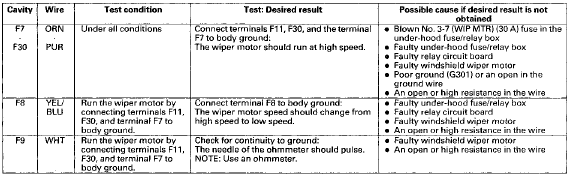
DTC B1077: Windshield Wiper Auto-stop (AS)
Signal Circuit Malfunction
NOTE: If you are troubleshooting multiple DTCs, be sure
to follow the instructions in B-CAN System Diagnosis
Test Mode A (see ...
 WiperA/Vasher Switch
Test / Replacemen
WiperA/Vasher Switch
Test / Replacemen
1. Remove the steering column covers {see page
20-181).
2. Disconnect the dashboard wire harness 8P connector
(A) from the wiper/washer switch (B).
3. Remove the two screws, then slide out the ...
See also:
Special Tools
...
Alternator Overhaul
Exploded View
Special Tools Required
- Driver Handle, 15 x 135L 07749-0010000
- Bearing Driver Attachment, 42 x 47 mm 07746-0010300
NOTE: Refer to the Exploded View as needed during this
proced ...
Additional Safety Precautions
Do not let a child wear a seat belt
across the neck. This could result
in serious neck injuries during a
crash.
Do not let a child put the shoulder
part of a seat belt behind the back
or un ...