 Honda Accord: Shift Lock Stop/Shift Lock Stop Cushion
Replacement
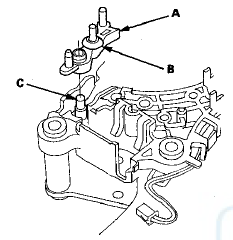
Type A Shift Lever
1. Remove the shift lock solenoid (see page 14-254).
2. Remove the shift lock stop (A) and the stop cushion (B) as a set.

3. Apply silicone grease to the pin (C) of the shift lever bracket, then install the shift lock stop over the pin.
NOTE: Make sure not to get any silicone grease on the terminal part of the connectors and switches, especially if you have silicone grease on your hands or gloves.
4. Install a new shift lock stop.
5. Install the shift lock solenoid (see page 14-253).
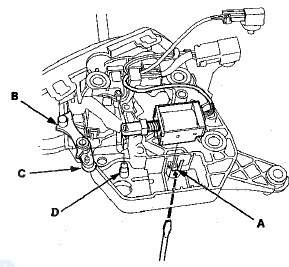
Type B Shift Lever
1. Remove the shift lever assembly (see page 14-222).
2. Remove the A/T gear position indicator panel from the shift lever (see page 14-228).
3. Release the lock tab (A) retaining the shift lock solenoid using a thin-bladed screwdriver.

4. Remove the shift lock stop (B) and the stop cushion (C) as a set.
5. Apply silicone grease to the pin (D) of the shift lever bracket, then install the shift lock stop over the pin.
NOTE: Make sure not to get any silicone grease on the terminal part of .the connectors and switches, especially if you have silicone grease on your hands or gloves.
6. Install a new shift lock stop.
7. Install the shift lock solenoid by aligning the joint of the shift lock solenoid plunger with the tip of the shift lock stop, then push the shift lock solenoid into the shift lever securely.
8. Install the A/T gear position indicator panel on the shift lever (see page 14-228).
9. Install the shift lever assembly (see page 14-224).
 Shift Lock Solenoid Replacement
Type A Shift Lever
1. Remove the shift lever assembly (see page 14-222).
2. Release the lock tabs (A) retaining the shift lock
solenoid using thin-bladed screwdrivers.
3. Insert a 6.0 mm (0.24 ...
 Shift Lock Release, Release Spring, and
Release Shaft Replacement
Type A Shift Lever
1. Remove the shift lever assembly (see page 14-222).
2. Remove the A/T gear position indicator panel from
the shift lever (see page 14-227).
3. Release the lock (A) of the ...
See also:
To Select a Station
You can use any of five methods to
find radio stations on the selected
band: tune, skip, scan, the preset
buttons, and auto select.
On the FM band, you can also use
the features provided by t ...
Ceiling Light Test/Replacement
1. Turn the celling light switch OFF.
2. Carefully pry the lens (A) off with a small screwdriver.
2. Carefully pry the lens (A) off with a small screwdriver.
Celling Light 8 W
3. Remove the ...
Front Door Glass Outer Weatherstrip
Replacement
NOTE:
- Put on gloves to protect your hands.
- Take care not to scratch the door.
1. Remove t h e s e Items:
- Door panel
- 2-door (see page 20-12)
- 4-door (see page 20-17)
- Plastic cover ...
