
 Honda Accord: Transmission Fluid Pressure Switch A
(2nd Clutch) Replacement
Honda Accord: Transmission Fluid Pressure Switch A
(2nd Clutch) Replacement
1. Remove the intake air duct.
2. Disconnect the connector (A) from the transmission fluid pressure switch A (2nd clutch) (B), and remove the transmission fluid pressure switch A (2nd clutch).
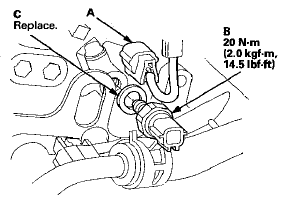
3. Install a new transmission fluid pressure switch A (2nd clutch) with a new sealing washer (C), and tighten the transmission fluid pressure switch A (2nd clutch) to the specified torque by turning the metal part, not the plastic part.
4. Check the connector for rust, dirt, or oil, and clean or repair if necessary, then connect the connector securely.
5. Install the intake air duct.
 Output Shaft (Countershaft) Speed
Sensor Replacement
Output Shaft (Countershaft) Speed
Sensor Replacement
1. Remove the nut securing the under-hood fuse/relay
box, and swing it out of the way.
2. Remove the intake air duct and the air cleaner
housing.
3. Disconnect the output shaft (countershaft) ...
 Transmission Fluid Pressure Switch B
(3rd Clutch) Replacement
Transmission Fluid Pressure Switch B
(3rd Clutch) Replacement
1. Raise the vehicle on a lift, or apply the parking brake,
block both rear wheels, and raise the front of the
vehicle. Make sure it is securely supported.
2. Remove the splash shield.
3. Disc ...
See also:
Playing an MP3/WMA Disc
The changer plays MP3/WMA files
in recorded order. Each disc can
hold up to 400 playable files within 8
folder layers. When playing MP3
discs, a disc can support a maximum
number of 100 fold ...
Checking the Engine
If the engine does not start, check the starter.
If you must start the vehicle immediately, use an
assisting vehicle to jump start it.
...
XM Antenna Replacement
1. Remove the headliner (see page 20-140).
2. Remove the nut (A) from the XM antenna (B).
3. Disconnect the connector (C) and remove the XM
antenna.
4. Install the XM antenna in the reverse ...