 Honda Accord: Transmission Fluid Pressure Switch B
(3rd Clutch) Replacement
Honda Accord: Transmission Fluid Pressure Switch B
(3rd Clutch) Replacement
1. Raise the vehicle on a lift, or apply the parking brake, block both rear wheels, and raise the front of the vehicle. Make sure it is securely supported.
2. Remove the splash shield.
3. Disconnect the connector (A) from the transmission fluid pressure switch B {3rd clutch) (B), then remove the transmission fluid pressure switch B (3rd clutch).
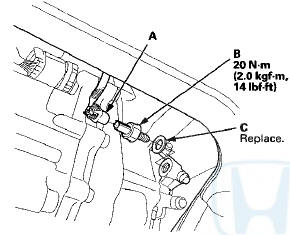
4. Install a new transmission fluid pressure switch B (3rd clutch) with a new sealing washer (C), and tighten the transmission fluid pressure switch B (3rd clutch) to the specified torque by turning the metal part, not the plastic part.
5. Check the connector for rust, dirt, or oil, and clean or repair if necessary, then connect the connector securely.
6. Install the splasTi shield.
 Transmission Fluid Pressure Switch A
(2nd Clutch) Replacement
Transmission Fluid Pressure Switch A
(2nd Clutch) Replacement
1. Remove the intake air duct.
2. Disconnect the connector (A) from the transmission
fluid pressure switch A (2nd clutch) (B), and remove
the transmission fluid pressure switch A (2nd clutch).
...
 ATF Temperature Sensor
Test/Replacement
ATF Temperature Sensor
Test/Replacement
1. Raise the vehicle on a lift, or apply the parking brake,
block both rear wheels, and raise the front of the
vehicle. Make sure it is securely supported.
2. Remove the splash shield.
3. Disc ...
See also:
For Safe Driving
The following pages explain your vehicle's safety features and how to use
them
properly. The safety precautions below are ones that we consider to be among the
most important. ...
Audio/Information Screen
Displays the audio status and wallpaper. From this screen, you can go to
various
setup options.
• Switching the Display
Press the (display) button to
change the display.
• Audio
Shows ...
Opening/Closing theWindows and Moonroof with the Key
You can open and close the windows
and the moonroof (if equipped) with
the key in the driver’s door lock.
To open:
1. Insert the key in the driver’s door
lock.
2. Turn the key clockwise ...