 Honda Accord: ATF Temperature Sensor
Test/Replacement
Honda Accord: ATF Temperature Sensor
Test/Replacement
1. Raise the vehicle on a lift, or apply the parking brake, block both rear wheels, and raise the front of the vehicle. Make sure it is securely supported.
2. Remove the splash shield.
3. Disconnect the shift solenoid wire harness connector.
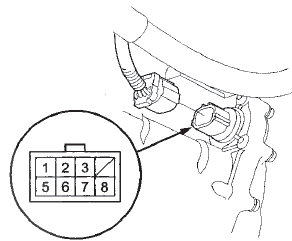
Terminal side of female terminals
4. Measure the ATF temperature sensor resistance between shift solenoid wire harness connector terminals No. 6 and No. 7.
Standard: 50 0 - 2 5 k

-If the resistance is within the standard. The test is complete, reconnect the connector, then install the splash shield.
-If the resistance is out of the standard, goto step 5.
5. Remove the drain plug (A), and drain the ATF.
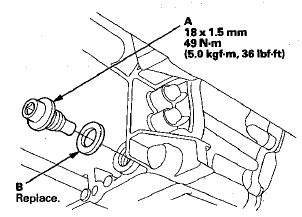
6. Reinstall the drain plug with a new sealing washer (B).
7. Remove the left front wheel.
8. Remove the shift solenoid valve cover (A), the dowel pins (B), and the gasket (C).
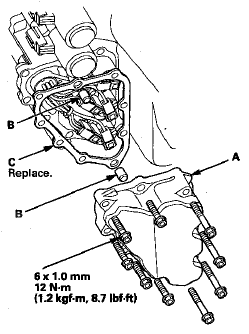
9. Remove the bolt securing the shift solenoid wire harness (A), then remove the shift solenoid wire harness (B) from the transmission housing.
10. Disconnect the connectors from the shift solenoid valves. Then replace the ATF temperature sensor and the O-ring (F) with new ones.
NOTE: The ATF temperature sensor is not available separately from the shift solenoid wire harness (Q).
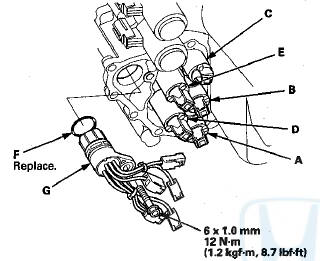
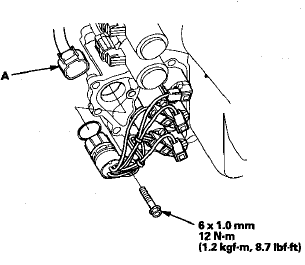
11. Connect the shift solenoid valve connectors: -BLU wire connector to shift solenoid valve A.
-ORN wire connector to shift solenoid valve B.
-GRN wire connector to shift solenoid valve C.
-YEL, WHT, and WHT wire connector to shift solenoid valve D -RED wire connector to shift solenoid valve E.
12. Install a new gasket, the dowel pins, and the shift solenoid valve cover.
13. Check the connector for rust, dirt, or oil, and clean or repair if necessary, then connect the connector securely.
14. Refill the transmission with ATF (see step 4 on page 14-192).
15. Install the splash shield.
16. Install the left front wheel.
 Transmission Fluid Pressure Switch B
(3rd Clutch) Replacement
Transmission Fluid Pressure Switch B
(3rd Clutch) Replacement
1. Raise the vehicle on a lift, or apply the parking brake,
block both rear wheels, and raise the front of the
vehicle. Make sure it is securely supported.
2. Remove the splash shield.
3. Disc ...
 ATF Level Check
NOTE:
-Keep all foreign particles out of the transmission.
-Check the ATF level within 60—90 seconds after
turning the engine off.
-Higher ATF level may be indicated if the radiator fan
...
See also:
To Turn Everything Off
To turn the system completely off,
press the ON/OFF button.
Keep the system completely off
for short periods only.
To keep stale air and mustiness
from collecting, you should have
the fan ru ...
Oil Seal Replacement
Special Tools Required
- Driver Handle, 15 x 135L 07749-0010000
- Oil Seal Driver Attachment 07NAD-P20A100
1. Remove the oil seal (A) from the transmission
housing (B).
...
Recirculation Control Motor Test
'08-09 models 4-door with A/T and "10 model
with A/T
NOTE: Before testing the motor, check for HVAC DTCs
(see page 21-9).
1. Disconnect the 7P connector from the recirculation
control moto ...