 Honda Accord: Countershaft Disassembly, Inspection,
and Reassembly
Honda Accord: Countershaft Disassembly, Inspection,
and Reassembly
1. Inspect the needle bearings for galling and rough movement.
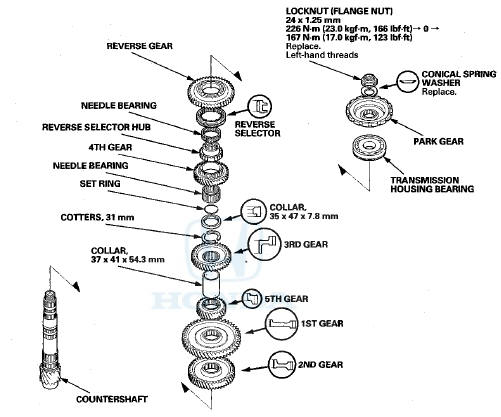
2. Inspect the splines for excessive wear and damage.
3. Check the shaft bearing surface for scoring and excessive wear.
4. Lubricate all parts with ATF during assembly.
5. Install the conical spring washer, the reverse selector, the 35 x 47 x 7.8 mm collar, and all gears in the direction shown.
6. Replace the locknut and the conical spring washer with new ones when assembling the transmission. The countershaft locknut has left-hand threads.
7. Some reverse selector hubs and 3rd gears are press-fitted to the countershaft; special tools are needed to remove them (see page 14-290) and to install them (see page 14-290).
 Mainshaft 5th Gear Axial Clearance
Inspection
Mainshaft 5th Gear Axial Clearance
Inspection
1. Remove the mainshaft transmission housing bearing
(seepage 14-270).
2. Install the thrust needle bearing ( A ) , 5th gear ( B ) , the
needle bearing (C), the thrust needle bearing (D), the
41 ...
 Countershaft Reverse Selector Hub and
3rd Gear Removal
Countershaft Reverse Selector Hub and
3rd Gear Removal
1. Install a commercially available bearing separator on
4th gear (A). Set the countershaft (B) on a press with a
spacer (C) between the press and the countershaft,
and remove the reverse selector ...
See also:
Circuit Diagram
...
Manual Transmission
On models with 5-speed manual
transmission, or models
with 6-speed manual transmission
The manual transmission is
synchronized in all forward gears for
smooth operation. It has a lockout so ...
Stabilizer Link Removal/Installation
1. Raise and support the vehicle (see page 1 -13).
2. Remove the rear wheel.
3. Remove the flange nut (A) and the self-locking nut (B)
while holding the respective joint pin (C) with a hex
wre ...