 Honda Accord: Mainshaft 5th Gear Axial Clearance
Inspection
Honda Accord: Mainshaft 5th Gear Axial Clearance
Inspection
1. Remove the mainshaft transmission housing bearing (seepage 14-270).
2. Install the thrust needle bearing ( A ) , 5th gear ( B ) , the needle bearing (C), the thrust needle bearing (D), the 41 x 68 mm thrust washer (E), the 4th/5th clutch (F), the 4th gear collar (G), and the transmission housing bearing ( H ) on the mainshaft ( I ) . Do not install the O-rings during inspection.
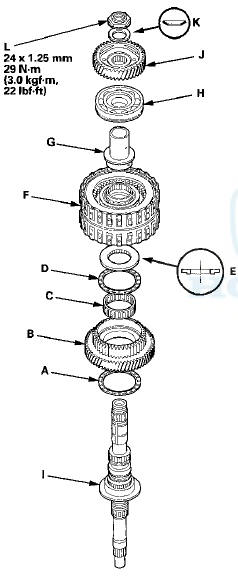
3. Install the idler gear (J) on the mainshaft with a press, then install the conical spring washer (K) and the locknut (L).
4. Tighten the locknut to 29 N-m (3.0 kgfm, 22 Ibf-ft).
5. Set a dial indicator ( A ) on 5th gear ( B ) .
6. Lift 5th gear (A) up while holding the mainshaft, and use the dial indicator (B) to read the 5th gear axial clearance.
7. Measure the 5th gear axial clearance in at least three places while moving 5th gear. Use the average as the actual clearance.
Standard: 0.04-0.10 mm (0.002-0.004 In)
8. If the clearance is out of standard, remove the 41 x 68 mm thrust washer and measure its thickness (A).
3. Select and install a new thrust washer, then recheck.
THRUST WASHER, 41 x 68 mm
10. After replacing the thrust washer, make sure the clearance is within the standard.
11. Disassemble the installed parts from the mainshaft.
12. Reinstall the transmission housing bearing in the transmission housing (see page 14-271).
 Mainshaft Disassembly, Inspection,
and Reassembly
Mainshaft Disassembly, Inspection,
and Reassembly
1. Inspect the thrust needle bearings and the needle bearings for galling and
rough movement
2. Inspect the splines for excessive wear and damage.
3. Check the shaft bearing surface for scorin ...
 Countershaft Disassembly, Inspection,
and Reassembly
Countershaft Disassembly, Inspection,
and Reassembly
1. Inspect the needle bearings for galling and rough movement.
2. Inspect the splines for excessive wear and damage.
3. Check the shaft bearing surface for scoring and excessive wear.
4. Lubr ...
See also:
Steering Wheel Installation
SRS components are located in this area. Review the
SRS component locations: 4-door {see page 24-21),
2-door (see page 24-23) and the precautions and
procedures (see page 24-25) before doing repair ...
How to Set Readiness Codes
Malfunction Indicator Lamp (MIL) Indication
(In relation to Readiness Codes)
The vehicle has certain readiness codes that are part of
the on-board diagnostics for the emissions systems, If
the veh ...
DTC Troubleshooting Index
Checking the DTCs by HDS
*:'10 model ...