 Honda Accord: Audio-HVAC Display Unit
Removal/Installation
Honda Accord: Audio-HVAC Display Unit
Removal/Installation
Without Navigation
NOTE; • Put on gloves to protect your hands.
• Take care not to scratch the dashboard.
1. Remove the audio unit (see page 23-114) and the center display visor (see page 20-171).
2. Remove the screws and bolts (A), then pull out the audio-HVAC display unit (B).
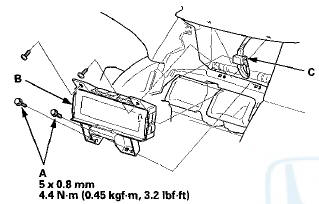
3. Disconnect the connector (C), and remove the audio-HVAC display unit.
4. Install the audio-HVAC display unit in the reverse order of removal.
 Audio-HVAC Subdisplay Unit
Removal/Installation
Audio-HVAC Subdisplay Unit
Removal/Installation
With Navigation
NOTE:
• Put on gloves to protect your hands.
• Take care not to scratch the dashboard.
1. Remove the dashboard center vent (see page 20-178).
2. Remove the screws, ...
 Stereo Amplifier
Removal/Installation
Stereo Amplifier
Removal/Installation
With Premium Audio System
1. Remove the glove box (see page 20-174).
2. Disconnect the connectors (A).
3. Remove the bolt (B) and loosen the bolts (C) securing
the stereo amplifier (D).
4. ...
See also:
Protecting Children - General Guidelines
Children depend on adults to protect
them. However, despite their best
intentions, many adults do not know
how to properly protect child
passengers.
If you have children, or ever need to
...
Special Tools
: Must be used with commercially
available 3/8"-16 slide hammer.
...
General Troubleshooting
Information
General Operation
Refer to the navigation system manual for the
navigation system operating procedures.
Anti-theft Feature
The navigation system and audio unit have a coded theft
protection circu ...