 Honda Accord: Stereo Amplifier
Removal/Installation
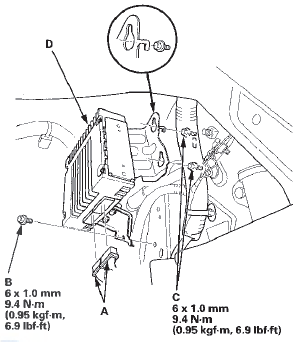
With Premium Audio System
1. Remove the glove box (see page 20-174).
2. Disconnect the connectors (A).

3. Remove the bolt (B) and loosen the bolts (C) securing the stereo amplifier (D).
4. Lower the stereo amplifier through the footwell area.
5. Install the stereo amplifier in the reverse order of removal.
 Audio-HVAC Display Unit
Removal/Installation
Without Navigation
NOTE;
• Put on gloves to protect your hands.
• Take care not to scratch the dashboard.
1. Remove the audio unit (see page 23-114) and the
center display visor (se ...
 XM Receiver Removal/Installation
1. Open the trunk lid, and remove the right trunk side
trim panel {see page 20-132).
2. Disconnect the connectors (A) from the XM receiver
(B).
4-Door
3. Remove the mounting bolt (C) and lo ...
See also:
Folder Repeat
This feature, when activated, replays
all files in the selected folder. To
activate folder repeat mode, select
FOLDER REPEAT by using the
interface knob, and press ENTER on
the interface sel ...
Secondary Shaft 2nd Gear Axial
Clearance Inspection
1. Install the thrust needle bearing (A), the needle
bearing (B), 2nd gear (C), the thrust needle bearing
(D), the 37 x 58 mm thrust washer (E), and the 2nd
clutch (F) on the secondary shaft (G), t ...
Playing AM/FM Radio
• Preset Memory
To store a station:
1. Tune to the selected station.
2. Press the MENU button.
3. Rotate to select Save Preset,
then press .
4. Rotate to select the preset
number you ...
