
 Honda Accord: Servo Body Disassembly, Inspection,
and Reassembly
Honda Accord: Servo Body Disassembly, Inspection,
and Reassembly
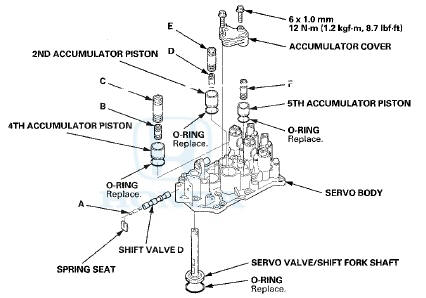
1. Clean all parts thoroughly in solvent, and dry them with compressed air. Blow out all passages.
2. Inspect the valve body for scoring and damage.
3. Check shift valve D for free movement. If it fails to slide freely, do the valve body repair procedure (see page 14-275).
4. When removing and installing the shift solenoid valves, refer to the shift solenoid valves removal and installation (see page 14-281).
5. Coat all parts with ATF during assembly.
6. Replace the O-rings with new ones.
SPRING SPECIFICATIONS

 Regulator Valve Body Disassembly,
Inspection, and Reassembly
Regulator Valve Body Disassembly,
Inspection, and Reassembly
1. Clean all parts thoroughly in solvent and dry them with compressed air.
Blow out all passages.
2. Inspect the valve body for scoring and damage.
3. Check all valves for free movement. If an ...
 Shift Solenoid Valve Removal and
Installation
Shift Solenoid Valve Removal and
Installation
NOTE:
-Do not hold the shift solenoid valve connector to
remove and to install the shift solenoid valves. Hold
the shift solenoid valve b o d y .
-Do not install the shift solenoid valve A before ...
See also:
Reporting Safety Defects
In the U.S.
If you believe that your vehicle has a defect which could cause a crash or
could cause injury or death, you should immediately inform
the National Highway Traffic Safety Administratio ...
VSA Modulator-Control Unit Update
Special Tools Required
- Honda diagnostic system (HDS) tablet tester
- Honda interface module (HIM) and an iN workstation
with the latest HDS software version
- HDS pocket tester
- GNA-600 and an ...
ODS Unit Replacement
Removal
1. Do t h e battery t e r m i n a l disconnection procedure (see
page 22-91), t h e n w a i t at least 3 minutes before
s t a r t i ng work.
2. Remove t h e f r o n t passenger's seat (s ...