 Honda Accord: Brake Fluid Level Switch Test
NOTE: If both the ABSA/SA indicator and the brake system indicator come on at the same time, check the VSA system for DTCs first (see page 19-48).
1. Disconnect the brake fluid level switch connector.
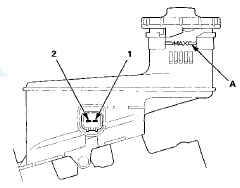
2. Check for continuity between the terminals (1) and (2) with the float in the down position and in the up position.
NOTE: - Remove the brake fluid completely from the reservoir. With the float down, there should be continuity.
- Fill the reservoir with brake fluid to the MAX (upper) level (A). With the float up, there should be no continuity.
- If the parking brake switch and brake fluid level switch are OK, but the brake system indicator does not function, do the gauge control module self-diagnostic function (see page 22-332).
3. Reconnect the brake fluid level switch connector
 Parking Brake Switch Test
NOTE: if both the ABS/VSA indicator and the brake
system indicator come on at the same time, check the
VSA system for DTCs first (see page 19-48).
1. Remove the center console (see page 20-158).
...
 Front Brake Pad Inspection and Replacement
Special Tools Required
Brake Caliper Piston Compressor 07AAE-SEPA101
Frequent inhalation of brake pad dust, regardless of
material composition, could be hazardous to your
health.
- Avoid breath ...
See also:
To Stop Playing a Disc
To take the system out of disc mode,
press the FM/AM button, the
button, or the AUX button (if
an appropriate unit is connected). To
return to disc mode, press the CD
button.
You can also ...
Tire Maintenance
In addition to proper inflation,
correct wheel alignment helps to
decrease tire wear. If you find a tire
is worn unevenly, have your dealer
check the wheel alignment.
Have your dealer check t ...