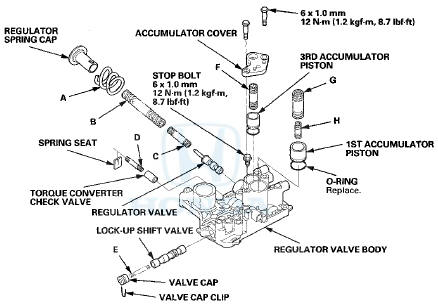
 Honda Accord: Regulator Valve Body Disassembly,
Inspection, and Reassembly
Honda Accord: Regulator Valve Body Disassembly,
Inspection, and Reassembly
1. Clean all parts thoroughly in solvent and dry them with compressed air. Blow out all passages.
2. Inspect the valve body for scoring and damage.
3. Check all valves for free movement. If any fail to slide freely, do the valve body repair procedure (see page 14-275).
4. Hold the regulator spring cap in place while removing the stop bolt. The regulator spring cap is spring loaded.
5. Coat all parts with ATF during assembly.
6. Replace the O-rings with new ones.
7. When reassembling the valve body, align the hole in the regulator spring cap with the hole in the valve body, then press the spring cap into the valve body, and tighten the stop bolt.
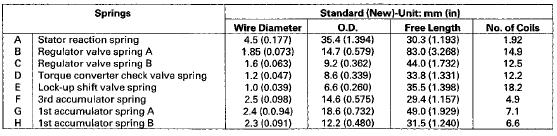
SPRING SPECIFICATIONS
 ATF Pump Inspection
1. Install the ATF pump drive gear (A), the driven gear
(B), and the ATF pump driven gear shaft (C) in the
main valve body (D). Lubricate all parts with ATF, and
install the ATF pump driven gear wi ...
 Servo Body Disassembly, Inspection,
and Reassembly
Servo Body Disassembly, Inspection,
and Reassembly
1. Clean all parts thoroughly in solvent, and dry them with compressed air.
Blow out all passages.
2. Inspect the valve body for scoring and damage.
3. Check shift valve D for free movement. I ...
See also:
Cam Chain Removal
NOTE: Keep the cam chain away from magnetic fields.
1. Remove the front wheels.
2. Remove the splash shield (see step 25 on page 5-5).
3. Remove the drive belt (see page 4-30).
4. Remove t ...
Manual Transmission and M/T Differential
...
Rear Bumper Removal/Installation
NOTE:
- Have an assistant help you when removing and
installing the rear bumper.
- Take care not to scratch the rear bumper or the body.
- Put on gloves to protect your hands.
- When prying ...