 Honda Accord: Rearview Camera

About Your Rearview Camera
The audio/information screen can display your vehicle’s rear view.
The display automatically changes to a rear view when the shift lever is moved to (R.
The rear camera view is restricted. You cannot see the corner ends of the bumper or what is underneath the bumper. Its unique lens also makes objects appear closer or farther than they actually are.
Visually confirm that it is safe to drive before backing up. Certain conditions (such as weather, lighting, and high temperatures) may also restrict the rear view. Do not rely on the rearview display which does not give you all information about conditions at the back of your vehicle.
If the camera lens is covered with dirt or moisture, use a soft, moist cloth to keep the lens clean and free of debris.
You can change the Fixed Guideline and Dynamic Guideline settings.
Fixed Guideline
On: Guidelines appear when you shift into (R.
Off: Guidelines do not appear.
Dynamic Guideline
On: Guidelines move according to the steering wheel
direction.
Off: Guidelines do not move.
• Rearview Camera Display Area
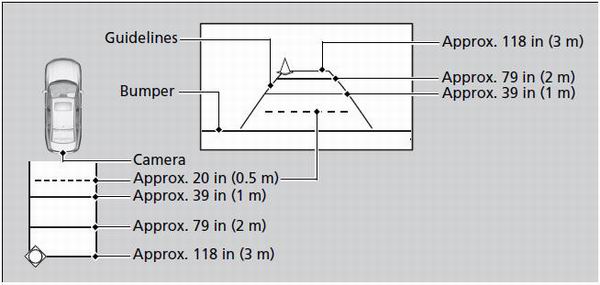
The rearview camera has a unique lens that makes objects appear closer or further than they actually are.
 Multi-View Rear Camera
About Your Multi-View Rear Camera
The audio/information screen can display your vehicle’s rear view. The
display
automatically changes to the rear view when the shift lever is moved to (R.
T ...
 Refueling
...
See also:
Blower Unit Removal/Installation
1. Remove the glove box (see page 20-174).
2. Remove the passenger's undercover (see page
20-170).
3. Remove the right kick panel (see page 20-107).
4. Remove the dust and pollen filter asse ...
Important Safety Precautions
Refer to the safety information that
came with your garage door opener
to test that the safety features are
functioning properly. If you do not
have this information, contact the
manufacture ...
Playing a USB Flash Memory Device (Models with navigation system)
Playing a USB Flash Memory Device (Models with navigation system) ...