 Honda Accord: Secondary Shaft Bearing
Replacement
Honda Accord: Secondary Shaft Bearing
Replacement
Special Tools Required
•Driver Handle, 15 x 135L 07749-0010000
•Attachment, 62 x 68 mm 07746-0010500
1. Remove the set plate bolt, then remove the lock washer (A) and the bearing set plate (B).
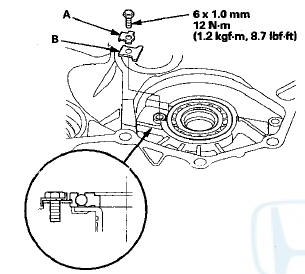
2. Remove the secondary shaft bearing (A) by heating the torque converter housing to about 212 В°F (100 В°C) using a heat gun (B). Do not heat the torque converter housing more than 212 В°F (100 В°C).
NOTE: Let the torque converter housing cool to normal temperature before installing the secondary shaft bearing.
3. Remove the ATF guide collar with the O-rings. Clean and dry the ATF guide collar surfaces and the torque converter housing if necessary.
4. Install new O-rings (A) on the ATF guide collar (B), then install the ATF guide collar in the torque converter housing.
5. Install a new secondary shaft bearing (C) in the direction shown.
6. Install the secondary shaft bearing using the driver handle and the 62 x 68 mm attachment, and install it securely in the torque converter housing.

7. Check that the bearing groove aligns with the torque converter housing surface, then install the bearing set plate with aligning the bearing groove.
8. Install a new lock washer and the set plate bolt, then bend the lock tab of the lock washer against the bolt head.
 Countershaft Bearing Replacement
Special Tools Required
-Adjustable Bearing Puller, 2 5 - 4 0 mm 07736-A01000B
-Driver Handle, 15 x 135L 07749-0010000
-Attachment, 62 x 68 mm 07746-0010500
1. Remove the countershaft bearing using ...
 Selector Control Shaft Oil Seal
Replacement
Selector Control Shaft Oil Seal
Replacement
Special Tools Required
-Driver Handle, 15 x 135L 07749-0010000
-Oil Seal Driver Attachment 07947-ZV00100
1. Remove the oil seal (A) from the torque converter
housing (B).
2. Install a new oil s ...
See also:
Circuit Diagram
M/T model
A/T modeS
...
Ambient Light Replacement
With moonroof
NOTE: The ambient light is built into the moonroof
switch.
1. Remove the front individual map lights (see page
22-258).
2. Disconnect the moonroof switch 12P connector (A)
and ...
Ignition Switch
WARNING
Removing the key from the ignition switch
while driving locks the steering. This can
cause you to lose control of the vehicle.
Remove the key from the ignition switch
only when p ...