 Honda Accord: Rear Door Sash Inner Trim
Replacement
Honda Accord: Rear Door Sash Inner Trim
Replacement
4-door
NOTE: Take care not to scratch the door.
1. Remove the door panel (see page 20-38).
2. Lower the glass fully.
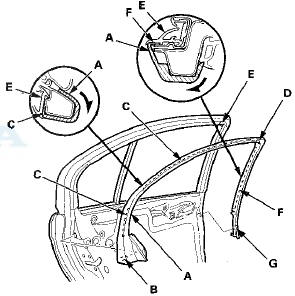
3. Remove the door sash inner trim (A).
-1. Pull back the outside edge of the trim to release the rear hook (B) from the door.
-2. Pull back along the outside edge of the trim to release the hooks or the hook strips (C) from the door glass opening flange at the quarter glass area and the roof area of the door sash.
-3. Release the hook (D) from the glass run channel (E) at the front corner of the door sash.
-4. Pull back along the outside edge of the trim to release the hooks or hook strip (F) from the door glass opening flange at the B-pillar area of the door sash.
-5. Release the front hook (G) from the door.
Japan-produced models
USA-produced models
4. Install the trim in the reverse order of removal, and push the hooks or the hook strips into place securely.
 Rear Door Glass and Regulator
Replacement
Rear Door Glass and Regulator
Replacement
4-door
NOTE: Put on gloves to protect your hands.
1. Remove the door panel (see page 20-38).
2. Disconnect the power door lock actuator connector
(A), and detach the harness clips (B). Remove ...
 Rear Door Sash Outer Trim
Replacement
Rear Door Sash Outer Trim
Replacement
4-door
NOTE: Take care not to scratch the door.
1. Remove the door outer molding (see page 20-54).
2. Pull up the door sash outer trim (A) to release the trim
from the clips, and release the t ...
See also:
Selector Centre! Sheft Bearing
Replacement
Special Tools Required
•Driver Handle, 15 x 135L 07749-0010000
-Attachment, 22 x 24 mm 07746-001A800
1. Remove the oil seal from the end cover, then remove
the bearing.
2. Install a new be ...
Setting the Clock
Clock
You can adjust the time in the clock display with the ignition switch is in
ON
The clock is automatically updated through the
navigation system, so the time does not need to be
adju ...
Shift Lock Solenoid Test
1. Connect the HDS to the DLC (A) located under the
driver's side of the dashboard.
2. Turn the ignition switch to ON (II). Make sure the HDS
communicates with the PCM. If it does not, go to the
...