 Honda Accord: Rear Door Glass and Regulator
Replacement
Honda Accord: Rear Door Glass and Regulator
Replacement
4-door
NOTE: Put on gloves to protect your hands.
1. Remove the door panel (see page 20-38).
2. Disconnect the power door lock actuator connector (A), and detach the harness clips (B). Remove the plug caps (C).
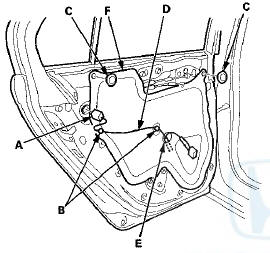
3. Pass the wire harness (D) through the hole (E) in the plastic cover (F), then remove the plastic cover.
NOTE: If the plastic cover is damaged or torn, replace it with a new one.
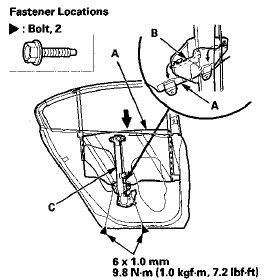
4. Lower the glass (A) until you can see the bolts, then remove them. Release the glass from the holder (B), then remove the glass from the regulator (C), and carefully lower the glass. Take care not to drop the glass inside the door.
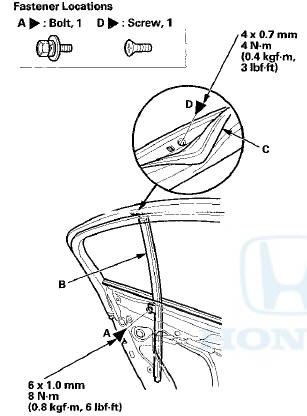
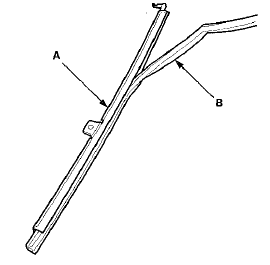
5. Remove the bolt (A) from the rear lower channel (B).
Pull away the door weatherstrip (C) as needed, and remove the screw (D).
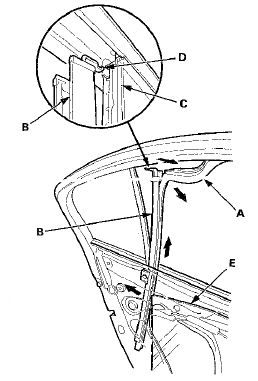
6. Pull away the glass run channel (A) as needed. Pull the rear lower channel (B) forward from the quarter glass seal (C), then release the upper hook (D) from the door. Remove the rear lower channel from the door glass (E), then pull up the channel to remove it.
7. Remove the rear lower channel (A) from the glass run channel (B).
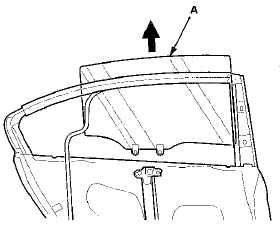
8. Carefully remove the glass (A) out through the window slot. Take care not to drop the glass inside the door,
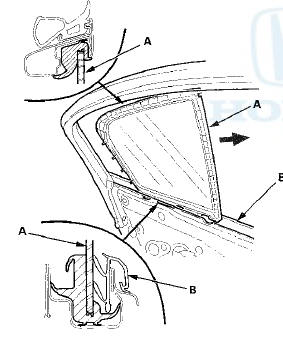
9. Remove the quarter glass (A). Take care not to damage the door glass outer weatherstrip (B).
10. Disconnect the connector (A) from the regulator (B).
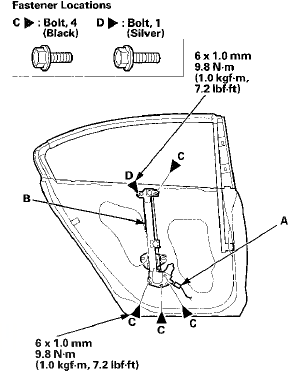
11. Remove the bolts (C), and loosen the bolt (D), then remove the regulator through the hole in the door.
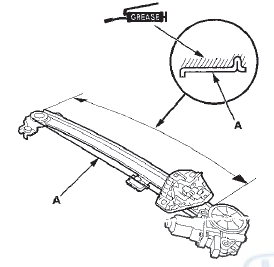
12. Apply multipurpose grease to all the sliding surfaces of the regulator (A) where shown.
13. Install the glass and the regulator in the reverse order of removal, and note these items: - If the clips are damaged or stress-whitened, replace them with new ones.
- Roll the glass up and down to make sure it moves freely without binding.
- Make sure that there is no clearance between the glass and the glass run channel when the glass is closed.
- Make sure the connector is plugged in properly.
- Adjust the position of the glass as necessary (see page 20-56).
- Make sure the power door locks operate properly.
- Make sure the plastic cover on the door is installed properly and sealed around its outside perimeter to - Push the clips and the hook into place securely.
- Check for water leaks (see step 9 on page 20-57).
- Test-drive the vehicle, and check for wind noise and rattles.
 Rear Door Latch Replacement
4-door
NOTE: Put on gloves to protect your hands.
1. Remove the door panel and the inner handle (see
page 20-38).
2. Remove the plastic cover as needed (see step 3 on
page 20-42).
3. Detac ...
 Rear Door Sash Inner Trim
Replacement
Rear Door Sash Inner Trim
Replacement
4-door
NOTE: Take care not to scratch the door.
1. Remove the door panel (see page 20-38).
2. Lower the glass fully.
3. Remove the door sash inner trim (A).
-1. Pull back the outside edge ...
See also:
Vehicle Identification Number
Manufacturer, Make, and Type of Vehicle
1HG: Honda of America Mfg., Inc.
Honda passenger vehicle
JHM: Honda Motor Co., Ltd.
Honda passenger vehicle
Line, Body, and Engine Type
CP2: Accord/ ...
Power Window Master Switch Input
Test
NOTE: Before testing, troubleshoot the multiplex Integrated control unit
first, using B-CAN System Diagnosis Test Mode
A (see page 22-134).
1. Turn the ignition switch to LOCK (0), open and clos ...
MICU Input Test
NOTE:
# Before t e s t i n g , t r o u b l e s h o o t the m u l t i p l e x i n t e g
r a t e d control unit first, using B-CAN System D i a g n o s i s Test Mode A
(see page 22-134).
• B ...