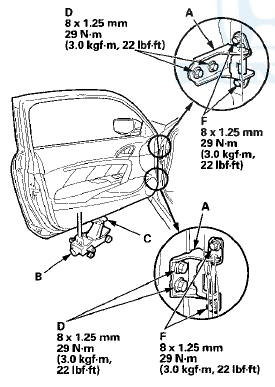
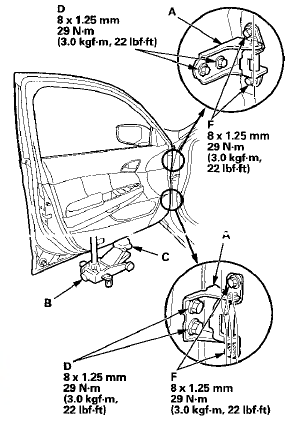
 Honda Accord: Door Position Adjustment
NOTE: Check for a flush fit with the body, then check for equal gaps between the front, rear, and bottom door edges and the body. Check that the door and body edges are parallel.
1. Place the vehicle on a firm, level surface when adjusting the doors.
2. Adjust at the hinges (A): - Pad a floor jack (B) with shop towels (C), then use the jack to support the door while adjusting it.
- On the front door: Remove the front inner fender (see page 20-290). Loosen the hinge mounting bolts (D) slightly, and move the door backward or forward, up or down as necessary to equalize the gaps.
- On the rear door: Loosen the hinge mounting bolts (E) slightly, and move the door backward or forward, up or down as necessary to equalize the gaps.
2-door
4-door front
4-door rear
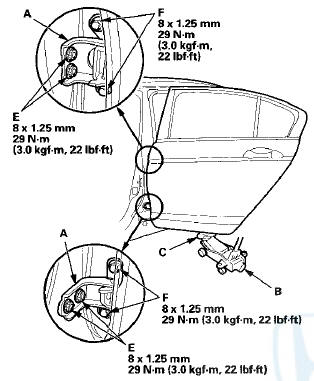
3. If necessary, replace the door mounting bolts with the adjusting bolts made specifically for door adjustment, then adjust at the door: Loosen the door mounting bolts (F) slightly, and move the door up or down as necessary to equalize the gaps, and move it in or out until is not flush with the body.
NOTE: Refer to the Parts Catalog if you need use an adjusting bolt.
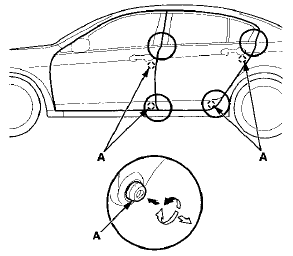
4. Check that the door and the body edges are parallel. If necessary, adjust the door cushions (A) to make the rear of the doors flush with the body.
5. Apply touch-up paint to the hinge mounting bolts, and around the hinges.
6. Check for water leaks (see step 9 on page 20-57).
 Door Glass Adjustment
NOTE: Check the door weatherstrip and the glass run
channel for damage or deterioration, and replace them if
necessary.
1. Place the vehicle on a firm, level surface when
adjusting the door glas ...
 Door Striker Adjustment
Make sure the door latches securely without slamming
it. If necessary, adjust the striker (A): The striker nuts are
fixed, but the striker can be adjusted slightly up or down,
and in or out.
1. ...
See also:
Input Shaft (Mainshaft) Speed Sensor
Replacement
1. Remove the nut securing the under-hood fuse/relay
box, and swing it out of the way.
2. Remove the intake air duct and the air cleaner
housing.
3. Disconnect the input shaft (mainshaft) spee ...
Voice Control System
The audio system can also be
operated by voice control. See the
navigation system manual for
complete details. ...
Using HFL
HFL Buttons
HFL Talk button - Press and release to give a command or answer
a call.
HFL Back button - Press and
release to end a call, go back to the
previous command, or cancel the
comman ...