 Honda Accord: Rear Brake Caliper Overhaul
Frequent inhalation of brake pad dust, regardless of material composition, could be hazardous to your health.
- Avoid breathing dust particles.
- Never use an air hose or brush to clean brake assemblies. Use an OSHA-approved vacuum cleaner.
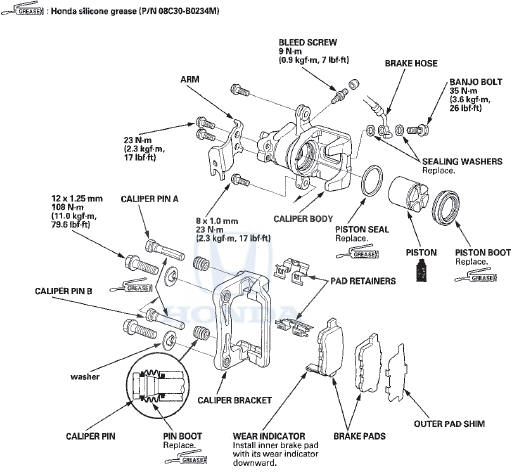
Remove, disassemble, inspect, reassemble, and install the caliper, and note these items: NOTE: Make sure that the caliper pins are installed correctly. Upper caliper pin A and lower caliper pin B are different. If these caliper pins are installed in the wrong location, it will cause vibration, uneven or rapid brake pad wear, and possibly uneven tire wear.
- Do not spill brake fluid on the vehicle; it may damage the paint. If brake fluid gets on the paint, wash it off immediately with water.
- To prevent dripping brake fluid, cover disconnected hose joints with clean rags or shop towels.
- Clean all parts in brake fluid and air dry; blow out all passages with compressed air.
- Before reassembling, check that all parts are free of dirt and other foreign particles, e Replace parts with new ones as specified in the illustration.
- !Y!2ke sure no dirt or other foreign matter gets in the brake fluid.
- Make sure no grease or oil gets on the brake discs or the pads.
- When reusing brake pads, always reinstall them in their original positions to prevent loss of braking efficiency.
- Do not reuse drained brake fluid. Use only new Honda DOT 3 Brake Fluid from an unopened container. Using a non-Honda brake fluid can cause corrosion and shorten the life of the system.
- Coat the piston, the piston seal groove, and the caliper bore with clean brake fluid.
- Use recommended greases in the rear caliper set.
- After installing the caliper, check the brake hose and line for leaks, interference, and twisting.
 Rear Brake Disc Replacement
NOTE: Keep any grease off the brake disc and the brake
pads.
1. Raise and support the vehicle (see page 1-13).
2. Remove the rear wheel.
3. Release the parking brake lever fully.
4. Loose ...
 Brake Pedal Replacement
1. Disconnect the brake pedal position switch
connector ( A ) .
2. Remove the lock pin (B) and the clevis pin (C).
3. Remove the brake pedal support member (D).
4. Remove the brake pedal bra ...
See also:
Wiper Motor Test
4-door
1. Remove the driver's side wiper arm (see page
22-321).
2. Remove the left side cowl cover (see page 22-321).
3. Disconnect 5P connector (A) from the windshield
wiper motor (B).
4. ...
System Description
SRS Components
Airbags
The SRS is a safety device which, when used with the seat belt, is designed
to help protect the driver and front
passenger in a frontal impact exceeding a certain set limit ...
Block and Piston inspection
1. Remove the crankshaft and the pistons (see page
7-14).
2. Check the piston for distortion or cracks.
3. Measure the piston diameter at a point 13 mm (0.5 in)
from the bottom of the skirt. T ...