 Honda Accord: Wiper Motor Test
4-door
1. Remove the driver's side wiper arm (see page 22-321).
2. Remove the left side cowl cover (see page 22-321).
3. Disconnect 5P connector (A) from the windshield wiper motor (B).
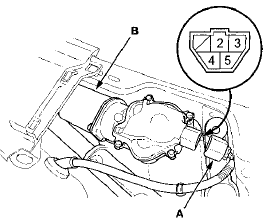
4. Test the motor by connecting battery power to terminal No. 3 and ground to terminal No. 2 of the wiper motor connector 5P connector. The motor should run at low speed.
5. Test the motor by connecting battery power to terminal No. 5 and ground to terminal No. 2 of the wiper motor 5P connector. The motor should run at high speed.
6. Connect an analog ohmmeterto terminals No. 4 and No. 2, and run the motor at low or high speed. The needle of the ohmmeter should pulse.
7. If the motor does not run or fails to run smoothly, or there is no pulse, replace the motor.
2-door
1. Remove the driver's side wiper arm (see page 22-321).
2. Remove the left side cowl cover (see page 22-321).
3. Disconnect 5P connector (A) f r om the windshield wiper motor (B).
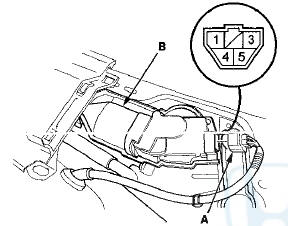
4. Test the motor by connecting battery power to terminal No. 3 and ground to terminal No. 4 of the wiper motor 5P connector. The motor should run at low speed.
5. Test the motor by connecting battery power to terminal No. 5 and ground to terminal No. 4 of the wiper motor 5P connector. The motor should run at high speed.
6. Connect an analog ohmmeter to terminals No. 1 and No. 4, and run the motor at low or high speed. The needle of the ohmmeter should pulse.
7. If the motor does not run or fails to run smoothly, or there is no pulse, replace the motor.
 WiperA/Vasher Switch
Test / Replacemen
WiperA/Vasher Switch
Test / Replacemen
1. Remove the steering column covers {see page
20-181).
2. Disconnect the dashboard wire harness 8P connector
(A) from the wiper/washer switch (B).
3. Remove the two screws, then slide out the ...
 Washer Motor Test
1. Remove the right inner fender (see page 20-290).
2. Disconnect the 2P connector (A) from the windshield
washer motor (B).
USA models
3. Test the motor by connecting battery power to
term ...
See also:
Special Tools
...
Middle Floor Undercover
Replacement
Left Side
NOTE:
- Put on gloves to protect your hands.
- Take care not to scratch the body.
1. Remove the bolts and release the hook (A), then
remove the left middle floor undercover (B).
...
Ignition Key Light Test
1. Remove the steering column upper and lower covers
(see page 20-181).
2. Disconnect the 6P connector (A).
3. The LED should come on when power is connected to
terminal No. 6 and ground is co ...