 Honda Accord: Rear Brake Disc Replacement
NOTE: Keep any grease off the brake disc and the brake pads.
1. Raise and support the vehicle (see page 1-13).
2. Remove the rear wheel.
3. Release the parking brake lever fully.
4. Loosen the parking brake cable adjusting nut (see page 19-8).
5. Remove the flange bolt (A) from the arm (B).
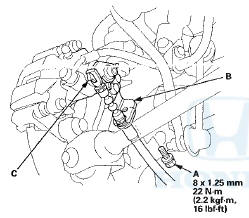
6. Disconnect the parking brake cable from the lever (C).
7. Remove the brake hose mounting bolt (A).
8. Remove the brake caliper bracket mounting bolts (B), and remove the caliper assembly (C) from the knuckle. To prevent damage to the caliper assembly or brake hose, use a short piece of wire to hang the caliper assembly from the undercarriage. Do not twist the brake hose and the parking brake cable excessively.
NOTE: Make sure the washers (D) are in position on reassembly, if they are removed (see step 8 on page 18-39).
9. Remove the brake disc flathead screws (A),
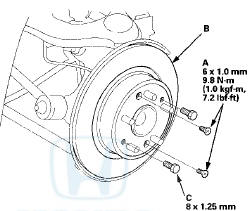
10. Remove the brake disc (B) from the hub bearing unit.
NOTE: If the brake disc is stuck to the hub bearing unit, thread two 8 x 1.25 mm bolts (C) into the brake disc to push it away from the hub bearing unit. Turn each bolt 90 degrees at a time to prevent the brake disc from binding.
11 . Install the brake disc in the reverse order of removal, and note these items: - Adjust the parking brake (see page 19-8).
- Before installing the brake disc, clean the mating surfaces between the hub bearing unit and the inside of the brake disc.
12. Inspect the brake disc runout (see page 19-33).
13. After install the brake caliper, make sure the clearance between the lower arm B and the parking brake cable is more than 5 mm (0.20 in).
14. Clean the mating surfaces between the brake disc and the inside of the wheel, then install the rear wheel.
 Rear Brake Disc Inspection
Runout
1. Raise and support the vehicle (see page 1-13).
2. Remove the rear wheels.
3. Remove the brake pads (see page 19-31),
4. Inspect the brake disc to wheel surface for damage
and cracks ...
 Rear Brake Caliper Overhaul
Frequent inhalation of brake pad dust, regardless of material composition,
could be hazardous to your health.
- Avoid breathing dust particles.
- Never use an air hose or brush to clean brake ...
See also:
Hood Seal and Hood Molding
Replacement
NOTE: Take care not to scratch the hood.
1. Detach the clips (A) with a clip remover, then remove
the hood seal (B). On Canada models: Detach the clips
(C), then remove the hood molding (D).
2-d ...
Driver's Inner Dashboard Trim
Removal/Installation
Special Tools Required
KTC Trim Tool Set SOJATP2014*
*Available through the Honda Tool and
Equipment
Program; call 888-424-6857
NOTE:
- Take care not to scratch the dashboard or the related
pa ...
Headlight Replacement
4-door
1. Remove the parts shown.
• Upper fender trim (see page 20-277)
• Front bumper (see page 20-255)
• Front bumper absorber (see page 20-255)
2. Remove the three bolts, and ...